반응형

이번엔 외부시스템과 인터페이스 통신을 하는데, SSL 통신을 한다. 근데 뭐 고객사에서는 SSL 통신을 하는데 인증서도 안주고 도메인으로 통신하는 것도 아닌 IP 통신인지라 당연히 PKIX 오류가 발생하기 마련.

이 오류는 SSL 통신시 인증서 검증에서 실패했다는 뜻으로, 우리가 흔히 웹 브라우저로 인터넷 하다가도 '신뢰 할 수 없는 인증서입니다~ 무시하고 계속할래~?' 하는 식으로 묻는것도 이와 같은 맥락이라고 볼 수 있다. 

curl 에서는 -k 옵션 하나로 간단히 무시할 수 있는데, JAVA 에서는 쉽지 않았다. 이하는 try catch 부분.


java 1.8 및 SpringBoot 2.7.8 에서 수행했다.


오류는 다음과 같다.

sun.security.validator.ValidatorException: PKIX path building failed: sun.security.provider.certpath.SunCertPathBuilderException: unable to find valid certification path to requested target


대충 curl 호출부는 다음과 같다. 이렇게 호출하면 성공한다.

curl -H 'Content-Type: application/json' -H 'Authrization: Basic toke' -k -x POST 'https://111.111.111.111:443/test/v1/auth/token' ;


curl 호출시 -k 옵션은 인증서 검증 우회하겠다는 의미이다.


이하는 java 소스코드.

전반적으로 httpURLConnection과 같은 양상을 띄지만 SSL 통신 설정부라거나, 기타 잡다한 설정들이 더 추가가 되어있다.


1
2
3
4
5
6
7
8
9
10
11
12
13
14
15
16
17
18
19
20
21
22
23
24
25
26
27
28
29
30
31
32
33
34
35
36
37
38
39
40
41
42
43
44
45
46
47
48
49
50
51
52
53
54
55
56
57
58
59
60
61
62
63
64
65
66
67
68
69
70
71
72
73
74
75
76
77
78
79
80
81
82
83
84
85
86
87
88
89
90
91
92
93
94
95
96
97
98
99
100
101
102
103
104
105
106
107
108
109
110
111
112
113
114
115
116
117
118
119
120
121
122
123
124
125
126
127
128
129
130
131
package com.test.common.utils;
 
import java.io.BufferedReader;
import java.io.InputStreamReader;
import java.io.OutputStream;
import java.net.URL;
import java.security.cert.CertificateException;
import java.security.cert.X509Certificate;
import java.util.Map;
 
import javax.net.ssl.HostnameVerifier;
import javax.net.ssl.HttpsURLConnection;
import javax.net.ssl.SSLContext;
import javax.net.ssl.SSLSession;
import javax.net.ssl.TrustManager;
import javax.net.ssl.X509TrustManager;
 
import org.json.simple.JSONObject;
import org.json.simple.parser.JSONParser;
import org.slf4j.Logger;
import org.slf4j.LoggerFactory;
 
import com.fasterxml.jackson.databind.ObjectMapper;
 
public class HttpsURLConnector {
    private Logger logger = LoggerFactory.getLogger(this.getClass());
    
    public JSONObject postURL ( String urlData , Map<String, Object> headers , Map<String, Object> param) {
        JSONObject jsonResult = new JSONObject();
        
        //Http 요청시 필요한 URL 주소의 변수 선언
        String totalUrl = "";
        totalUrl = urlData.trim().toString();
        
        // http 통신 객체 선언
        URL url = null;
        HttpsURLConnection httpConn = null;
        
        // http 통신 응답에 대한 변수
        String resData = "";
        BufferedReader buff = null;
        StringBuffer strBuff = null;
        
        // 호출 결과값에 대한 변수
        String returnData = "";
        try {
            ObjectMapper mapper = new ObjectMapper();
            String paramData = mapper.writeValueAsString(param);
            
            // url.openConnection을 시도하기 전에 아래 설정을 완료한다
            TrustManager[] trustAllCerts = new TrustManager[] { new X509TrustManager() {
                public X509Certificate[] getAcceptedIssuers() {
                    return null;
                }
 
                public void checkClientTrusted(java.security.cert.X509Certificate[] chain, String authType) {
                }
 
                public void checkServerTrusted(java.security.cert.X509Certificate[] chain, String authType) {
                }
            } };
            
            SSLContext sslContext;
            sslContext = SSLContext.getInstance("SSL");
            sslContext.init(null, trustAllCerts, null);
            
            HttpsURLConnection.setDefaultSSLSocketFactory(sslContext.getSocketFactory());
            
            // 파라미터로 들어온 url을 사용하여 connection 시도
            url = new URL(totalUrl);
            httpConn = (HttpsURLConnection) url.openConnection();
            httpConn.setHostnameVerifier(new HostnameVerifier( ) {
                
                @Override
                public boolean verify(String hostname, SSLSession session) {
                    // return true로 해주어야 모든 SSL 검증을 무시함
                    return true;
                }
            });
            
            // http 요청 설정
            httpConn.setRequestMethod("POST");
            httpConn.setRequestProperty("Content-Type""application/json; utf-8");
            httpConn.setRequestProperty("Accept""application/json");
            
            // header 파라미터 설정
            if ( headers != null ) {
                for ( Map.Entry<String, Object> header : headers.entrySet()) {
                    httpConn.setRequestProperty(header.getKey(), header.getValue().toString());
                }
            }
            
            // Body부 생성 - doOutPut을 true로 주어야함
            httpConn.setDoOutput(true);
            try (OutputStream os = httpConn.getOutputStream() ){
                byte requestData[] = paramData.getBytes("utf-8");
                os.write(requestData);
                os.close();
            } catch ( Exception e) {
                logger.error("== OutputStream ERROR ::::: " + e.getMessage());
            }
            
            //커넥션~
            httpConn.connect();
            
            // 응답에 대한 데이터를 Buffer로 받아 처리
            buff = new BufferedReader(new InputStreamReader(httpConn.getInputStream(), "UTF-8"));
            strBuff = new StringBuffer();
            while ( ( resData = buff.readLine() ) != null ) {
                strBuff.append(resData); // StringBuffer에 응답받은 데이터를 순차적으로 저장함
            }
            
            returnData = strBuff.toString();
                
            //https 응답코드
            String resCode = String.valueOf(httpConn.getResponseCode());
            JSONParser parser = new JSONParser();
            Object obj = new Object();
            try {
                obj = parser.parse(strBuff.toString());
            } catch (Exception e) {
                logger.error("StringBuff Parser ERROR ::::: " + e.getMessage());
            }
            jsonResult = (JSONObject) obj;
        } catch (Exception e) {
            logger.error("TOTAL Error ::::: " + e.getMessage());
        }
        
        return jsonResult;
    }
}
cs


TrustAllCerts 부분과 setHostnameVerifier 부분을 잘 염두에 두면 큰 문제 없이 성공할 수 있다.

가장 중요한 부분은 url.openconnection  하기 전에 trustAllCerts를 선언해주어야 한다는 점이었다....

반응형
블로그 이미지

김생선

세상의 모든것을 어장관리

,
반응형

sftp를 활용할 프로젝트가 생겼다. 대충 개발망에서는 라이브러리가 없으니까, 외부 개인 놋북에서 샘플소스코드를 작성 하고 라이브러리를 반입하기로 했다. 이하는 대충 짜보고 찾아보고 제미니에게 물어본 소스코드.


Springboot 2.7.8, jcraft jsch 라이브러리는 0.1.55 버전 (0.1.54 버전도 동작됨을 확인함) 이다.

1
2
3
4
5
6
<!-- https://mvnrepository.com/artifact/com.jcraft/jsch -->
<dependency>
    <groupId>com.jcraft</groupId>
    <artifactId>jsch</artifactId>
    <version>0.1.55</version>
</dependency>
cs


1. SftpUtil.java

유틸과 같이 target Path , target FileName 정도만 입력받으려고 구성했다. 어차피 sftp 접속정보는 application.properties에 작성되어있을거니까.

1
2
3
4
5
6
7
8
9
10
11
12
13
14
15
16
17
18
19
20
21
22
23
24
25
26
27
28
29
30
31
32
33
34
35
36
37
38
39
40
41
42
43
44
45
46
47
48
49
50
51
52
53
54
55
56
57
58
59
60
61
62
63
64
65
66
67
68
69
70
71
72
73
74
75
76
77
78
79
80
81
82
83
84
85
86
87
88
89
90
91
92
93
94
95
96
97
98
99
100
101
102
103
104
105
106
107
108
package com.test.common.utils;
 
import java.io.File;
import java.io.FileInputStream;
import java.io.InputStream;
 
import org.slf4j.Logger;
import org.slf4j.LoggerFactory;
 
import com.jcraft.jsch.Channel;
import com.jcraft.jsch.ChannelSftp;
import com.jcraft.jsch.JSch;
import com.jcraft.jsch.JSchException;
import com.jcraft.jsch.Session;
 
public class SftpUtil {
    private static final String SESSION_CONFIG_STRICT_HOST_KEY_CHECKING = "StrictHostKeyChecking";
    private static final Logger logger = LoggerFactory.getLogger(SftpUtil.class);
 
    private String host;
    private String username;
    private String password;
    
    private int port;
    private int timeout = 15000;
 
    public SftpUtil(String host, String username, String password, String port) {
        this.host = host;
        this.username = username;
        this.password = password;
        this.port = Integer.parseInt(port);
    }
 
    private ChannelSftp createSftp() throws Exception {
        JSch jsch = new JSch();
 
        Session session = createSession(jsch, host, username, port);
        session.setPassword(password);
        session.connect(timeout);
 
        Channel channel = session.openChannel("sftp");
        channel.connect(timeout);
 
        return (ChannelSftp) channel;
    }
 
    private Session createSession(JSch jsch, String host, String username, int port) throws Exception {
        Session session = null;
 
        if (port <= 0) {
            session = jsch.getSession(username, host);
        } else {
            session = jsch.getSession(username, host, port);
        }
 
        session.setConfig(SESSION_CONFIG_STRICT_HOST_KEY_CHECKING, "no");
        logger.info("===== session ::::: " + session);
 
        return session;
    }
 
    private void disconnect(ChannelSftp sftp) {
        try {
            if (sftp != null) {
                if (sftp.isConnected()) {
                    sftp.disconnect();
                } else if (sftp.isClosed()) {
                }
                if (null != sftp.getSession()) {
                    sftp.getSession().disconnect();
                }
            }
        } catch (JSchException e) {
            e.printStackTrace();
        }
    }
 
    // Rest에서 호출함
    public boolean uploadFile(String targetPath, String fileName, File file) throws Exception {
        FileInputStream fis = new FileInputStream(file);
        ChannelSftp sftp = this.createSftp();
        try {
            sftp.cd(targetPath);
            sftp.put(fis, fileName);
            return true;
        } catch (Exception e) {
            logger.debug("==== exception ::::: " + e.getMessage());
            throw new Exception("Upload File failure");
        } finally {
            this.disconnect(sftp);
        }
    }
 
    // Rest에서 호출함
    public boolean downloadFile(String remoteFilePath, String localSavePath) throws Exception {
        ChannelSftp sftp = this.createSftp();
        try {
            sftp.get(remoteFilePath, localSavePath);
            return true;
        } catch (Exception e) {
            logger.debug("==== exception ::::: " + e.getMessage());
            throw new Exception("Download File failure");
        } finally {
            this.disconnect(sftp);
        }
    }
 
}
cs


소스코드가 좀 길기는 한데, 어차피 Upload / Download는 공통적인 connection / disconnection 과정을 거치기에 상관은 없다.


호출부는 다음과 같다.


2. Rest Controller 

1
2
3
4
5
6
7
8
9
10
11
12
13
14
15
16
17
18
19
20
21
22
23
24
25
26
27
28
29
@PostMapping("/testSftpUpload")
public String testSftpUpload(@RequestBody String a) {
    String result = "";
    
    SftpUtil ftp = new SftpUtil( sftpHost, sftpUsername, sftpPassword, sftpPort );
    File file = new File("C:\\Users\\KimFish\\Desktop\\TEST.csv");
    try {
        ftp.uploadFile("/C:/sftp""1234.csv", file);
    } catch (Exception e) {            
        e.printStackTrace();
    }
    
    return result;        
}
 
@PostMapping("/testSftpDownload")
public String testSftpDownload(@RequestBody String a) {
    String result = "";
    
    SftpUtil ftp = new SftpUtil( sftpHost, sftpUsername, sftpPassword, sftpPort );
    File file = new File("C:\\Users\\KimFish\\Desktop\\TEST.csv");
    try {
        ftp.downloadFile("/C:/sftp/1234.csv""/C:/Users/KimFish/Desktop/test1234.csv");
    } catch (Exception e) {            
        e.printStackTrace();
    }
    
    return result;        
}
cs


이정도면 충분한듯.

각각의 호출부는 host , port , userid , userpw 모두 입력받고, 메서드에 따라 파일 및 경로 등을 같이 인자값으로 던지게 된다. 일단은 이정도로 되었다... 


*** 알아둘 점 ***

리눅스에서 디렉토리 구분자는 / 를 사용하는데 반해, 윈도우에서는 디렉토리 구분자를 \를 써야 한다.

그런데 ftp(sftp포함)에서는 무조건 /를 사용해야하니 저렇게 작성된 것. 그에 비해 File 메서드 같은 경우는 Windows OS에서 구동되는 자바 프로그램이기 때문에 \ 를 사용함을 볼 수 있다.

이렇게 또 하나 배우는구만... 어차피 리눅스 드가면 슬래쉬 쓸거...

반응형
블로그 이미지

김생선

세상의 모든것을 어장관리

,
반응형

windows 11 에서 sftp 개발을 할 일이 생겼다.

별도 개발서버도 없고 하니 그냥 개인 노트북에 sftp 서비스를 열고, 관련된 계정을 생성하면 될 것이라 대충 예상하고 구글링을 시작. 다음과 같은 순서대로 sftp 서비스를 windows11 에서 구동했다.


1. sftp 관련 windows 추가프로그램 설치

노란색 색칠한거 다 설치함


제어판 > 프로그램 및 기능 > Windows 기능 켜기/끄기 메뉴에서 위와 같은 노란색의 항목들을 모두 설치했다. 그런데 이것만으로는 안열리길래, 좀 더 찾아보니 다음과 같은것도 설치해야 하더라.


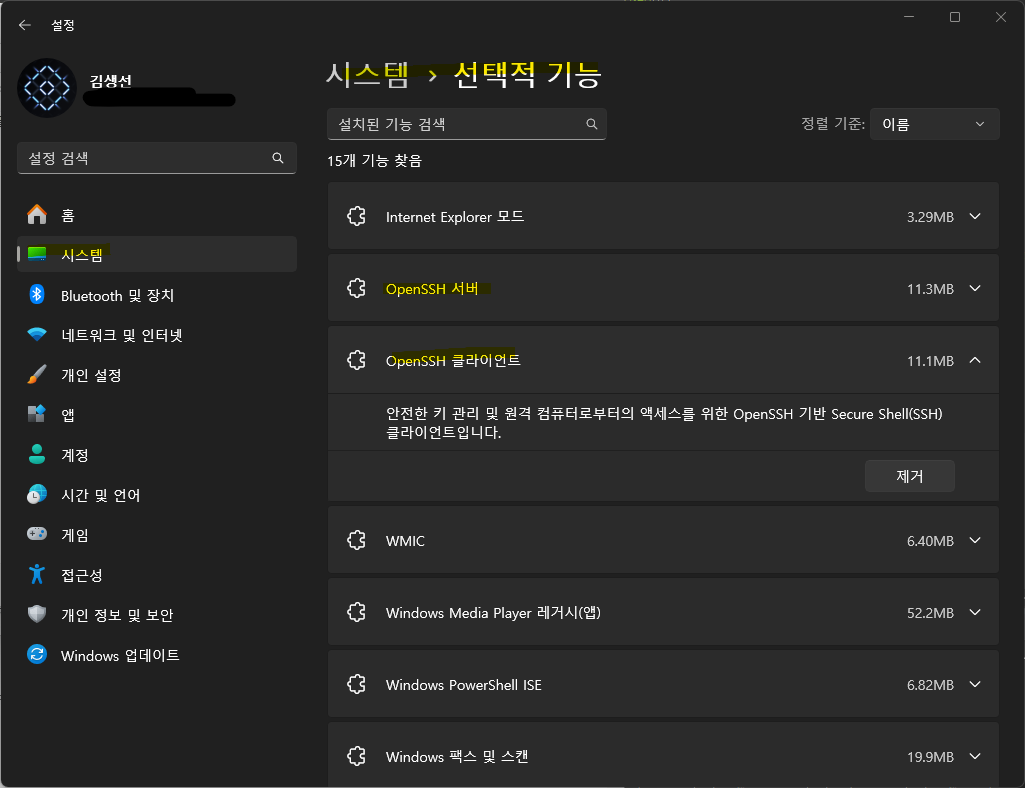
설정 > 시스템 > 선택적기능 메뉴에서 OpenSSH 서버 및 OpenSSH 클라이언트를 모두 설치했다. 비로소 서비스를 구동할 준비가 된 셈.


2. sftp 전용 계정 생성

컴퓨터 관리 > 로컬사용자 및 그룹 > 사용자 에서 오른클릭을 통해 새 사용자를 만들어준다.

이 때 사용자 이름 및 암호/암호확인은 자신의 취향껏 작성해주고, 귀찮지 않으려면 '암호사용기간 제한없음' 옵션을 추가하자. 어차피 로컬 개발용이니까 개발하는데는 문제는 없다.


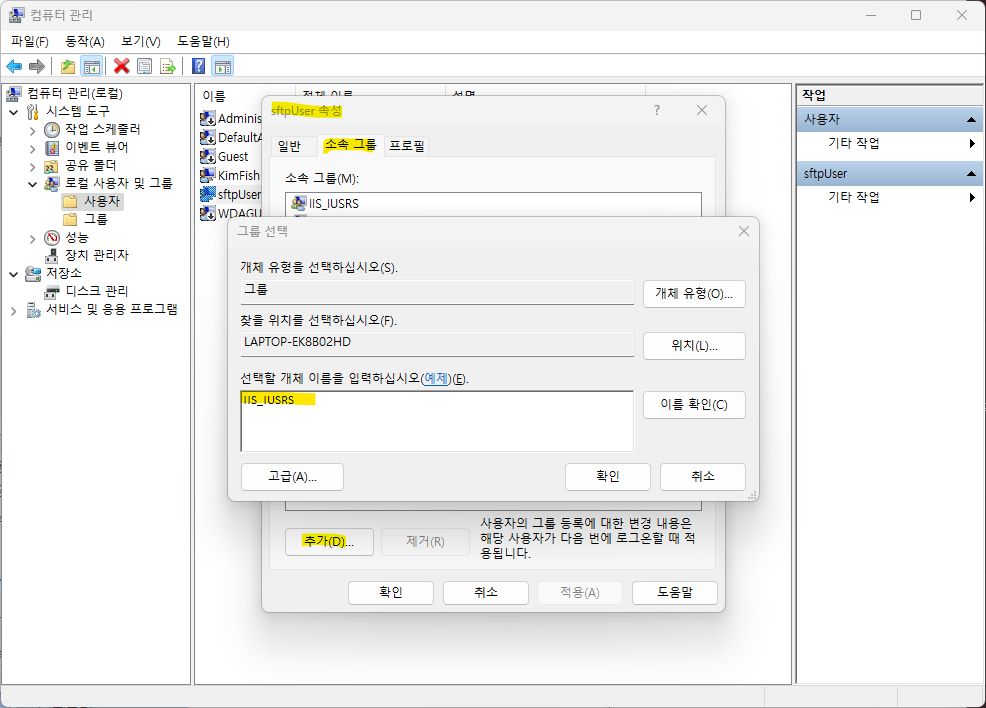
새로 만들어준 계정에 IIS_IUSRS 그룹권한을 넣어준다. 이 부분은 깊게 파보진 않았는데 IIS_IUSRS쪽이 IIS 서비스를 담당하는 그룹 권한인 것으로 추정된다. 아무튼, 이 계정으로 이제 sftp를 접속할 수 있는 셈.


3. sftp 서비스 시작

OpenSSH Server 시작

서비스 메뉴로 들어가서 OpenSSH Server 를 실행하자. 이제 기본포트(sftp의 경우 22) 로 서버가 구동된 셈이다.


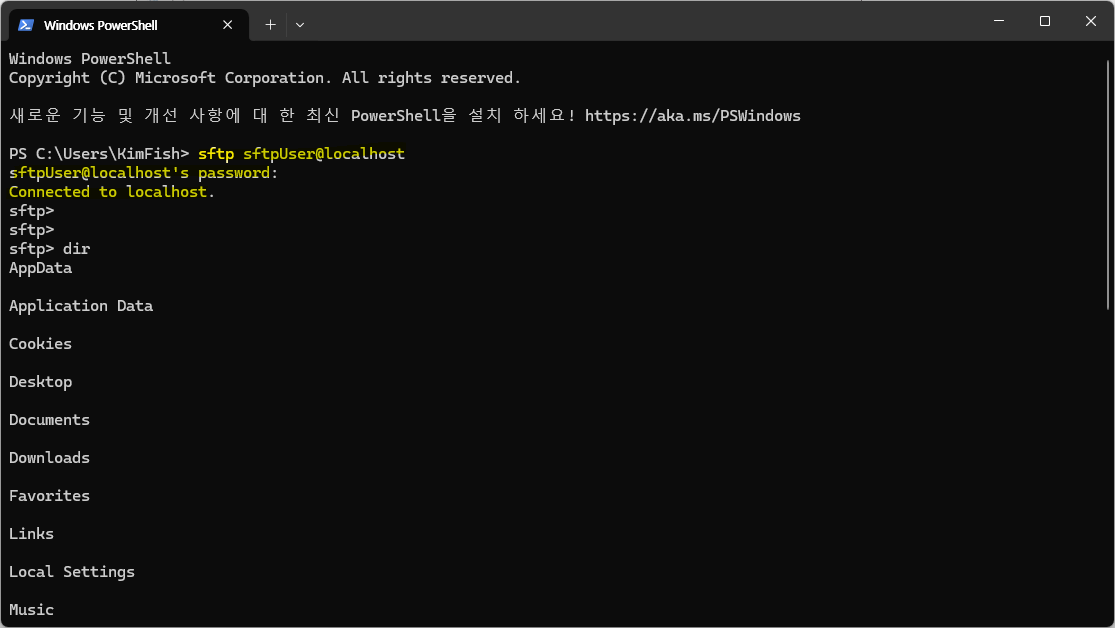
Windows Powershell을 통해 sftp sftpUser@localhost 명령어를 입력하면 sftp에 접속된 것을 확인할 수 있다. 

이로써 sftp 서비스 구동은 끝.


IIS 서비스 쪽에서 sftp 바인딩을 18800으로 해줬는데도 접속을 못하길래  삽질하다가 알고보니 기본포트로 서비스가 열린것을 확인했다. 18800 포트로 어떻게 바꾸는거지? 이걸 좀 더 찾아봤다.


4. sftp 서비스 포트 변경

C:\ProgramData\ssh 디렉토리에 sshd_config 라는 파일이 존재하고, 이를 열어보면 다음과 같이 설정됨을 확인할 수 있다.


#Port 22
#AddressFamily any
#ListenAddress 0.0.0.0
#ListenAddress ::


주석으로 막혀있다는 것은 기본으로 설정된 것이 22 라는거고, 이걸 18800 으로 바꾸고 주석을 해제하면 잘 되겠지? 한 번 해보자.


관리자 권한을 요구하길래, 메모장 프로그램을 오른클릭 > 관리자권한 으로 실행한 다음 sshd_config 파일을 열어 수정했다.


그리고 서비스 > OpenSSH SSH Server를 재시작!


테스트용 소스코드가 정상적으로 동작됨을 확인했다.

Powershell 에서 sftp 접속하는 명령어는 sftp -P port userId@host 가 된다. ㅋㅋㅋ 잘 되네 .

반응형
블로그 이미지

김생선

세상의 모든것을 어장관리

,
반응형

이거 뭐라 오류가 난 것도 좀 거시기 하고 해서 쓰기가 애매하긴 한데, 아무튼.

Springboot 2.7.8 버전에서 Controller > Service > ServiceImpl > mapper > sql 로 이루어지는 과정에 있어 Return VO가 null 인 것을 확인했다.


쿼리도 그렇고 VO도 그렇고 아무런 문제가 없는것임에도 불구하고 도저히 뭐가 문제인지를 모르겠어서, sql에서 resultType을 VO가 아닌 java.util.hashMap 으로 받아보았더니 정상적으로 DB 쿼리가 조회되는데, Key 값이 스네이크 케이스로 들어온 것을 확인했다. 이러니까 카멜케이스 기반으로 작성된 vo에 매핑이 안되어서 null이 뜨는거지.


그런데 이게 대체 왜 지금와서 문제지? 지금까지 수행해온 프로젝트에서는 이거 다 매핑이 되었는데? 싶었다.

대충 찾아보니 mybatis 에서 이걸 옵션값으로 넣어주어야 한다는데, 내가 처음부터 밑바닥부터 세팅한 프로젝트는 지금이 처음이라서 그런가 싶었다.


아무튼, application-local.properties에 아래와 같이 넣어주니 스네이크 케이스의 컬럼값이 카멜케이스의 vo 값에 잘 넣은것을 확인할 수 있었다.

1
2
3
 
mybatis.configuration.map-underscore-to-camel-case=true
 
cs


와 진짜 별거 아닌걸로 30분은 날린 것 같네. 지금까지는 어디선가 이 옵션을 누가 넣어줬던걸 썼나... 

반응형
블로그 이미지

김생선

세상의 모든것을 어장관리

,
반응형

http request logging이라고 표현하는게 옳은것인지는 잘 모르겠지만 아무튼, API 인터페이스 서버를 개발하면서 요청시스템코드/요청자 아이디/응답시간/요청URI 와 같은 것들만을 간단하게 로깅해야하는일이 생겼다.

과거 다른 프로젝트에서 해둔 게 있었는데 전자정부 기반(이라고 해봤자 사실 스프링이랑 차이가 없음)이라, 조금 손보고 해서 SpringBoot 2.7.8 버전에 맞게 수정했다.


이것만 해서는 되지 않고, 기존에는 직접 해당 interceptor 에서 log파일까지 생성해서 append 하는 방식이었는데, 나는 이걸 logback에서 로깅하는 방식으로 수정해보았다. 로컬 개발환경에서는 잘 돌아가지만, 개발서버에서는 DispatcherServlet도 같이 로깅되는 문제가 있기는 하다. 이거에 대해 수정하는 건 좀 나중으로 미루고, 일단은 까먹기 전에 기록을 먼저 하는 걸로 하자.


1. LoggingInterceptor.java

1
2
3
4
5
6
7
8
9
10
11
12
13
14
15
16
17
18
19
20
21
22
23
24
25
26
27
28
29
30
31
32
33
34
35
36
37
38
39
40
41
42
43
44
45
46
47
48
49
50
51
52
53
54
55
56
57
58
59
60
61
62
63
64
65
66
67
68
69
70
71
72
73
74
75
76
77
78
79
80
81
82
83
84
85
86
87
88
89
90
91
92
93
94
95
96
97
98
99
100
101
102
103
104
105
106
107
package com.test.common.config;
 
import java.text.SimpleDateFormat;
import java.util.Calendar;
 
import javax.servlet.http.HttpServletRequest;
import javax.servlet.http.HttpServletResponse;
 
import org.slf4j.Logger;
import org.slf4j.LoggerFactory;
import org.springframework.stereotype.Component;
import org.springframework.util.StringUtils;
import org.springframework.web.servlet.HandlerInterceptor;
import org.springframework.web.servlet.ModelAndView;
 
@Component
public class LoggerInterceptor implements HandlerInterceptor {
    private static final Logger logger = LoggerFactory.getLogger(LoggerInterceptor.class);
    
    @Override
    public boolean preHandle(HttpServletRequest req, HttpServletResponse res , Object handler) throws Exception {
        System.out.println("=== LoggerInterceptor ===");
        String contextPath = req.getContextPath();
        String requestUrl = req.getRequestURI().substring(contextPath.length());
        
        // 응답시간 체크를 위한 선언
        long startTime = System.currentTimeMillis();
        req.setAttribute("__start__time",  startTime);
        req.setAttribute("__call__time", getTodayStr("yyyyMMddHHmmss"));
        
        
        return true;
    }
    
    /** 
     * 로그 예시 
     * SYSTEM_CODE,yyyyMMddHHmmss,/test/api.do,00,9999,CALL_SYS_CD,CALL_USER,0:0:0:0:0:0:1
     */
    @Override
    public void postHandle(HttpServletRequest req , HttpServletResponse res , Object handler , ModelAndView modelAndView) throws Exception {
        long startTime = (long)req.getAttribute("__start__time");
        long endTime = System.currentTimeMillis();
        long resTime = endTime - startTime;         // 응답시간 계산
        
        // 호출일시
        String callTime = (String)req.getAttribute("__call__time");
        
        // 호출 URI
        String contextPath = req.getContextPath();
        String requestUrl = req.getRequestURI().substring(contextPath.length());
        
        // 호출 시스템 및 사용자 , api 통신시 http header에 세팅해야 함
        String callSysCd = req.getHeader("callSysCd");
        String callUser = req.getHeader("callUser");
        
        StringBuffer logSb = new StringBuffer();
        logSb.append("SYSTEM_CODE");
        logSb.append("," + callTime);
        logSb.append("," + requestUrl);
        logSb.append("," + "00");
        logSb.append("," + resTime);
        logSb.append("," + callSysCd);
        logSb.append("," + callUser);
        logSb.append("," + getClientIP(req));
        
        logger.info(logSb.toString());
    }
    
    
    /**
     * IP 가져오기
     */
    private static String getClientIP(HttpServletRequest req) {
        String ip = req.getHeader("X-Forwarded-For");
        
        if ( ip == null ) 
            ip = req.getHeader("Proxy-Client-IP");
        
        if ( ip == null ) 
            ip = req.getHeader("WL-Proxy-Client-IP");
        
        if ( ip == null ) 
            ip = req.getHeader("HTTP_CLIENT_IP");
        
        if ( ip == null ) 
            ip = req.getHeader("HTTP_X_FORWARDED_FOR");
        
        if ( ip == null ) 
            ip = req.getRemoteAddr();
        
        return ip;
    }
    
    // 오늘 날짜 String 리턴 
    private static String getTodayStr ( String pattern ) {
        if ( StringUtils.isEmpty( pattern ) ) {
            pattern = "yyyyMMdd";
        }
        
        SimpleDateFormat simpleDate = new SimpleDateFormat ( pattern );
        Calendar c1 = Calendar.getInstance();
        String strToday = simpleDate.format(c1.getTime());
        
        return strToday;
    }
}
 
cs


엄청 길어보이지만 사실 별거 아닌 소스이다. 

URL HttpServletRequest가 올 때 preHandle이 먼저 가로채서 적당한 데이터들을 가공해서 넣어준 후, URL에 매핑된 controller 가 실행된 후, postHandle이 가로채서 preHandle에 넣어준 데이터들을 빼내어 로그형태를 가공한다.


간단히 정리하자면 다음과 같다

(Client) Http URL 요청(Httprequest) -> (서버) Interface의 preHandle -> (서버) URL 매핑된 controller 로직 수행 -> (서버) client 응답 전 Interface의 postHandle -> (Client) Http URL 응답(HttpResponse)


그럼 이걸 어떻게 logback에서 설정했냐, 하면 다음과 같다.


2.WebConfig.java

1
2
3
4
5
6
7
8
9
10
11
12
13
14
15
16
17
18
19
20
21
22
23
24
25
package com.test.common.config;
 
import org.springframework.beans.factory.annotation.Autowired;
import org.springframework.context.annotation.Configuration;
import org.springframework.web.servlet.config.annotation.InterceptorRegistry;
import org.springframework.web.servlet.config.annotation.WebMvcConfigurer;
 
@Configuration
public class WebConfig implements WebMvcConfigurer {
    
    @Autowired
    HeaderInterceptor headerIntercepter;
    
    @Autowired
    LoggerInterceptor loggerInterceptor;
    
    @Override
    public void addInterceptors(InterceptorRegistry registry) {
        System.out.println("===== ===== WebMvcConfig ===== =====");
        // Header에 저장된 시스템 코드를 체크하기 위해 headerInterceptor를 add 해준다
        registry.addInterceptor(headerIntercepter).addPathPatterns("/test/**");
        // HttpRequest Logging을 위해 loggerInterceptor를 add 해준다.
        registry.addInterceptor(loggerInterceptor).addPathPatterns("/**");
    }
}
cs

logback을 설정하기 전, WebMvcConfig를 만들고 여기서 interceptor를 정의해주어야 한다.

23번째 줄이 LoggerInterceptor를 정의해주는 부분이다.


3. logback-spring.xml

1
2
3
4
5
6
7
8
9
10
11
12
13
14
15
16
17
18
19
20
21
22
23
24
25
26
27
28
29
30
31
32
33
34
35
36
37
38
39
40
41
42
43
44
<?xml version="1.0" encoding="UTF-8"?>
<configuration scan="true" scanPeriod="60 seconds">
    <property name="LOG_NAME" value="SampleProject" />
    <property name="LOG_HOME" value="/sw/apiServer/logs" />
    <property name="LOGBACK_HOME" value="/sw/apiServer/logs/old" />
    <property name="InterceptorLogPattern" value ="%msg %n" />
    
    <!--  개발툴 콘솔창 설정 -->
    <appender name ="CONSOLE" class="ch.qos.logback.core.ConsoleAppender">
        <encoder>
            <Pattern>%d{yyyy-MM-dd HH:mm:ss.SSS} [%thread] %-5level [%logger{0}:%line] - %msg %n</Pattern>
        </encoder>
    </appender>
    
    <!-- LoggerInterceptor 로그 파일 -->
    <appender name="INTERCEPTOR" class="ch.qos.logback.core.rolling.RollingFileAppender">
        <Append>true</Append>
        <file>${LOG_HOME}/insLog/${LOG_NAME}.log</file>
        <rollingPolicy class="ch.qos.logback.core.rolling.TimeBasedRollingPolicy">
            <fileNamePattern>${LOGBACK_HOME}/insLog/${LOG_NAME}-%d{yyyy-MM-dd}.log</fileNamePattern>
            <cleanHistoryOnStart>true</cleanHistoryOnStart>
            <maxHistory>365</maxHistory>
        </rollingPolicy>
        <filter class="ch.qos.logback.classic.filter.ThresholdFilter">
            <level>DEBUG</level>
        </filter>
        <encoder>
            <Pattern>${InterceptorLogPattern}</Pattern>
        </encoder>
    </appender>
    
    <root leve="WARN">
        <appender-ref ref="CONSOLE"/>
        <appender-ref ref="INTERCEPTOR"/>
    </root>
    
    <!-- 로그 대상 패키지 지정 -->
    <logger name="com.test.common" level="DEBUG" additivity="false">
        <appender-ref ref="CONSOLE" /> <!-- 개발 콘솔 -->
    </logger>
    <logger name="com.test.common.config" level="DEBUG" additivity="false">
        <appender-ref ref="INTERCEPTOR" /> <!-- 인터셉터 로그 -->
    </logger>
</configuration>
cs


logback 설정은 나중에 좀 더 자세히 알아보고,

nterceptor가 위치한 패키지의 경로를 41번 라인에서 지정해주고,

42번에서 지정한 appender-ref를 통해 위의 16번 라인의 appender 설정을 수행하게 된다.


가장 중요한 건, 41번 라인의 logger name 부분으로 여기에서는 로그를 찍을 대상 패키지를 지정해야한다.


이렇게 저장하면 큰 문제는 발생하지 않는데, 로컬에서는 내가 의도한대로 로그가 잘 남기는 하지만, 개발서버에서는 DispatcherServlet 로그가 잔존해서 남는 문제가 발생하고 있다. 문제까지는 아니긴 한데, 이게 왜 같은 패키지가 로컬/개발서버에서 각기 다르게 뜨는지는 조금 더 연구가 필요한 상황.


아무튼 이거 나중에 로그 파일 분리하는 방향으로 많이 활용될 것 같아 작성해보았다.


*** interceptor.log에 spring dispatcher servlet 로그 등이 남는 것들에 대해 수정하여 덧붙인다.

interceptor 로그에 위와 같이 작성할 경우, 스프링 프레임워크의 로그들도 남고 있었는데 오만가지 잡다한 설정을 수정해봐도 안되길래 혹시나, 싶은 마음으로 실행 스크립트를 살펴보니 --debug 옵션을 주고 있었다.

이걸 빼니까 위 설정만으로 해결이 완료됨ㅋㅋㅋㅋ


log 파일을 java interceptor 에서 직접 작성해야하나 아주 고민이 많았는데 다행히 잘 먹었다. ㅋㅋㅋ

반응형
블로그 이미지

김생선

세상의 모든것을 어장관리

,
반응형

API 서버를 구현하다보면 뭐 Header에 토큰을 넣느니, 시스템 구분코드를 넣어서 타 시스템은 튕겨낸다느니 하는 일종의 Autorization 로직을 구현하는 경우가 있다. 내부망 시스템에서 토큰까지는 조금 오버인 것 같고, 다만 허용 시스템 코드를 리스트화 한 후에 허용된 시스템만 API를 태우자, 는 방침에 따라 대충 구현해봤다.


구글 제미니가 코드를 기깔나게 짜주었는데, 개발망에서 잘 안돌길래 두시간동안 쌩고생 하면서 고친 썰도 같이 푼다. 시작.

1. HeaderInterceptor.java 구현

1
2
3
4
5
6
7
8
9
10
11
12
13
14
15
16
@Component
public class HeaderInterceptor extends HandlerInterceptorAdapter{
    @Override
    public boolean preHandle(HttpServletRequest req, HttpServletResponse res, Object handler) 
    throws Exception {
        String headAuth = req.getHeader("callSysCd"== null ? "" : req.getHeader("callSysCd");
        String authCode = "authCode";
        
        if(headAuth.equals(authCode)) {
            return true;
        }else {
            res.sendError(401"Not Authorized");
            return false;
        } 
    }
}
cs


HeaderInterceptor를 구현해준다. 대충 이렇게 구현하면 Spring 2.x 버전대에서는 HandlerInterceptorAdapter가 discard 되었다고 경고가 뜰 것이다. 그냥 써도 무관한데, 거슬리면 extends HandlerInterceptorAdapter 대신, implements HandlerInterceptor로 써주면 된다.

header에 callSysCd가 있는지를 판단하고, 있다면 "authCode"라는 문자열과 일치하는지 체크한다. 일치하면 그대로 API를 태우지만, 일치하지 않거나 없다면 401 에러를 return 하게 된다.

당연하게도, 검사문자열을 List 형태로도 구현할 수 있다.


2. WebMvcConfig.java 구현

1
2
3
4
5
6
7
8
9
10
11
@Configuration
public class WebConfig implements WebMvcConfigurer {
    
    @Autowired
    HeaderInterceptor headerIntercepter;
    
    @Override
    public void addInterceptors(InterceptorRegistry registry) {
        registry.addInterceptor(headerIntercepter).addPathPatterns("/test/**");
    }
}
cs


이렇게 구현해주고, 하단의 addPathPatterns에 걸러낼 url을 입력받는다. 위와 같이 입력받는 경우, localhost:8080/test/example.do와 같은 하위의 모든 url들은 interceptor에 의해 callSysCd의 여부를 체크할 것이다. 물론, localhost:8080/example.do 는 위의 패턴 url과 다르기에 여부체크를 하지 않는다.


이를 응용한다면, login.do는 header를 검사하지 않고 mypage.do와 같은 로그인이 필요한 부분에 대해서만 검사하는 식으로 응용이 가능하다.


3. 오류

외부망에서는 개발 순식간에 해두고, 개발망에서 적용했는데 interceptor가 하나도 안먹길래 대체 뭐가 문젠가 하고 뒤져보니 다음과 같이 별거 아닌곳에서 문제가 생겼었다.

나의 경우에는 위의 예시들이 com.test.config/* 디렉토리에 위치해 있었는데, 정작 메인메소드에서는 @SpringBootApplication(scanBasePackages="com.test.common") 이라고 되어있었으니 패키지 스캔이 제대로 안되어서 인터셉터들이 하나도 동작하지 않은것이었다. 로그도 안찍히고 해서 얼마나 당황했던지.


아무튼 별 거 아닌것을 찾아서 다행이었다.

반응형
블로그 이미지

김생선

세상의 모든것을 어장관리

,
반응형

요 며칠 쓰는 내용들은 죄다 한 3~4년 전 쯤 플젝하면서 다 설정해둔건데, 역시 사람은 기록해두지 않으면 까먹는건지 뭔지, 기억은 나는데 당최 이게 뭐드라? 하는게 많아 정리하기 시작했다.


아무튼, tibero driver와 같은 jar 파일 또는 커스텀 jar 파일들은 당연히 maven 센트럴 repository에 없기 때문에 maven build 또는 maven package를 하면 결과물 jar 파일 내에 패키징되지 않는다. 이를 위한 설정을 밑에 적어두니 나와 같이 혼란스러운 분들에게 도움이 되었으면 좋겠다.


tibero6-jdbc.jar 가 없는 상황.

1. pom.xml 설정

pom.xml 에서 다음과 같이 설정해준다.

1
2
3
4
5
6
7
8
9
10
11
12
13
14
15
<properties>
    <java.version>1.8</java.version>
    <webapp.lib>${basedir}/src/main/webapp/WEB-INF/lib</webapp.lib>
</properties>
    
<dependencies>
<!--  Tibero JDBC Project Import Library -->
    <dependency>
        <groupId>com.tmax.tibero</groupId>
        <artifactId>tibero-jdbc</artifactId>
        <version>6</version>
        <scope>system</scope>
        <systemPath>${webapp.lib}/tibero6-jdbc.jar</systemPath>
    </dependency>
</dependencies>
cs


<properties> 태그 하위에 <webapp.lib>의 경로를 설정해준다.

이후 webapp.lib은 하위의 외부 라이브러리들의 path를 잡아주는데 활용이 된다.

만약, src/main~ 의 경로가 아닌 다른 경로라면 당연히 수정해줘야한다.

tibero-jdbc 드라이버를 지정해주는데 있어 저런 식으로 해주면 된다. 기존에는 groupId나 artifactId들을 그냥 whatever로 설정했던것 같은데 이번에는 약간 공들여서 설정해보았다.


*** 가장 중요한 부분 ***

1
2
3
4
5
6
7
8
9
10
11
12
13
14
<build>
    <plugins>
        <plugin>
            <groupId>org.springframework.boot</groupId>
            <artifactId>spring-boot-maven-plugin</artifactId>
            <configuration>
                <includeSystemScope>true</includeSystemScope>
                <image>
                    <builder>paketobuildpacks/builder-jammy-base:latest</builder>
                </image>
            </configuration>
        </plugin>
    </plugins>
</build>
cs


pom.xml의 하단부 configuration 하위에 <includeSystemScope>true</includeSystemScope> 옵션을 꼭 넣어주어야 한다. 이 옵션을 넣어주지 않으면 다른 설정을 다 해줘도 maven package 할 때 죄다 빠져버리게 된다.


pom.xml 에서 이렇게 설정해주면 끝난다.


2. /src/main/webapp/WEB-INF/lib 하위에 라이브러리 추가

그냥 뭐 어려운 거 없이 folder를 만들어서 위의 디렉토리 구조에 맞게 라이브러리를 넣어주면 된다.


3. maven package

그냥 돌리면 끝난다.

tibero-jdbc-6.jar 있음ㅋ


그럼 jar package 파일에 잘 들어와있는것을 확인할 수 있다. ㅋㅋㅋ

반응형
블로그 이미지

김생선

세상의 모든것을 어장관리

,
반응형

여윽시 압축/압축해제를 구현할 일이 생겼다. 대충 그래서 몇가지 라이브러리를 테스트 해 보니 zip4j가 가장 무난하고 속도도 빨랐다. 사용법도 간편하고.

개인적으로 java.util 에서 구현하는 zip 유틸은 쓰기가 좀 귀찮은데(설정할게 많음) 거기에 fileinputstream으로 구현하니 엄청 느리더라. 100메가 csv 압축하는데 20분 걸리던가. buffer로 구현하면 조금 더 빨라진다는데, 사실 이런걸 직접 구현하는 재미도 있긴 하지만 나보다는 더 똑똑한 사람들이 구현해놓은 라이브러리를 갖다 쓰는게 더 낫지 않을까. 아무튼, 해봤다.


1. pom.xml

1
2
3
4
5
6
7
8
9
10
11
12
13
14
<!-- Spring Boot 2.7.8 에서 설정함 -->
<parent>
    <groupId>org.springframework.boot</groupId>
    <artifactId>spring-boot-starter-parent</artifactId>
    <version>2.7.8</version>
    <relativePath/> <!-- lookup parent from repository -->
</parent>
 
<!-- https://mvnrepository.com/artifact/net.lingala.zip4j/zip4j -->
<dependency>
    <groupId>net.lingala.zip4j</groupId>
    <artifactId>zip4j</artifactId>
    <version>2.11.5</version>
</dependency>
cs


대충 스프링부트 2.7.8 , zip4j 는 2.11.5를 썼다 이마리야


2. 파일 압축

1
2
3
4
5
6
7
8
9
10
11
12
13
14
15
16
17
18
19
20
21
22
23
24
25
26
27
28
29
30
31
32
33
34
35
36
37
38
39
40
41
42
43
44
45
import net.lingala.zip4j.ZipFile;
import net.lingala.zip4j.exception.ZipException;
import net.lingala.zip4j.model.ZipParameters;
import net.lingala.zip4j.util.Zip4jConstants;
 
import java.io.File;
 
public class SingleFileCompressionExample {
    public static void main(String[] args) {
        // 압축대상 파일 경로
        String sourceFilePath = "path/to/source/file.txt";
        // 압축결과 파일 경로
        String zipFilePath = "path/to/output.zip";
        // 암호를 사용할 경우
        String password = "yourPassword";
        
        try {
            ZipFile zipFile = new ZipFile(zipFilePath);
            zipFile.addFile(new File(sourceFilePath), createZipParameters(password));
            
            System.out.println("File compressed successfully!");
        } catch (ZipException e) {
            System.err.println("Error compressing file: " + e.getMessage());
        }
    }
    
    private static ZipParameters createZipParameters(String password) {
        ZipParameters zipParameters = new ZipParameters();
        
        zipParameters.setCompressionMethod(Zip4jConstants.COMP_DEFLATE);
        zipParameters.setCompressionLevel(Zip4jConstants.DEFLATE_LEVEL_ULTRA;
        
        // 패스워드를 정하는 경우, 여기에서 zipParameter에 암호 알고리즘 적용함
        if (password != null && !password.isEmpty()) {
            // 암호사용여부
            zipParameters.setEncryptFiles(true);  
            // 암호 알고리즘
            zipParameters.setEncryptionMethod(Zip4jConstants.ENC_METHOD_STANDARD);
            // 적용할 암호
            zipParameters.setPassword(password);
        }
        
        return zipParameters;
    }
}
cs


3. 파일 압축 해제

1
2
3
4
5
6
7
8
9
10
11
12
13
14
15
16
17
18
19
20
21
22
23
24
25
26
27
28
29
30
31
32
import net.lingala.zip4j.ZipFile;
import net.lingala.zip4j.exception.ZipException;
 
public class FileDecompressionExample {
    public static void main(String[] args) {
 
        // 압축해제 대상파일
        String zipFilePath = "path/to/input.zip";
        
        // 압축해제 대상 디렉토리
        String destDirectory = "path/to/destination";
        
        // 암호가 있는 경우
        String password = "yourPassword"// Set to null if the ZIP file is not encrypted
        
        try {
            ZipFile zipFile = new ZipFile(zipFilePath);
            
            // 암호가 있는 경우를 체크해서 적용함
            if (zipFile.isEncrypted() && password != null) {
                zipFile.setPassword(password);
            }
            
            zipFile.extractAll(destDirectory);
            
            System.out.println("Files extracted successfully!");
        } catch (ZipException e) {
            System.err.println("Error extracting files: " + e.getMessage());
        }
    }
}
 
cs


chatGPT 에게 물어보고 적용한건데 생각보다 너무 쉽게 잘 짜주어서 놀랐다. 앞으로 종종 써먹어야지.

반응형
블로그 이미지

김생선

세상의 모든것을 어장관리

,
반응형

지금 들어온 프로젝트에서는 application.properties의 DB 접속정보가 모두 암호화되어있다. 생전 이런건 또 처음이라 뒤져보니 역시나 보안을 위한 암호화라고. 뭐 내부망에서만 배포되고 서버내에서만 존재하는 *properties까지 암호화할일은 무엇인가 싶긴 한데 뭐 어디선가는 또 쓰기 마련이지. 아무튼 대략적으로 구현해보고 에러 트라이도 해보고 잘 볶아보았다.


1. pom.xml

1
2
3
4
5
6
7
8
9
10
11
12
13
14
15
16
17
18
19
20
21
<!-- Spring Boot 2.7.8 에서 설정함 -->
<parent>
    <groupId>org.springframework.boot</groupId>
    <artifactId>spring-boot-starter-parent</artifactId>
    <version>2.7.8</version>
    <relativePath/> <!-- lookup parent from repository -->
</parent>
 
<!-- 암복호화 모듈 jasypt -->
<dependency>
    <groupId>com.github.ulisesbocchio</groupId>
    <artifactId>jasypt-spring-boot-starter</artifactId>
    <version>3.0.5</version>
</dependency>
 
<!-- 테스트를 수행해본 mariadb -->
<dependency>
    <groupId>org.mariadb.jdbc</groupId>
    <artifactId>mariadb-java-client</artifactId>
    <version>2.7.11</version>
</dependency>
cs

대충 스프링부트 2.7.8에 jasypt 3.0.5 버전을 적용했다, 이마리야


2. JasyptConfig.java

1
2
3
4
5
6
7
8
9
10
11
12
13
14
15
16
17
18
19
20
21
22
23
24
25
26
27
28
29
30
31
32
package com.test.comm.util;
import org.jasypt.encryption.StringEncryptor;
import org.jasypt.encryption.pbe.PooledPBEStringEncryptor;
import org.jasypt.encryption.pbe.config.SimpleStringPBEConfig;
import org.springframework.beans.factory.annotation.Value;
import org.springframework.context.annotation.Bean;
import org.springframework.context.annotation.Configuration;
import com.ulisesbocchio.jasyptspringboot.annotation.EnableEncryptableProperties;
@Configuration
@EnableEncryptableProperties
public class JasyptConfig {
        
        @Value("${password}")
        private String passwd;
        
        @Bean("jasyptStringEncryptor")
        public StringEncryptor stringEncryptor() {
            PooledPBEStringEncryptor encryptor = new PooledPBEStringEncryptor();
            SimpleStringPBEConfig config = new SimpleStringPBEConfig();
            config.setPassword(passwd); // 암호화키
            config.setAlgorithm("PBEWithMD5AndDES"); // 알고리즘
            config.setKeyObtentionIterations("1000"); // 반복할 해싱 회수
            config.setPoolSize("1"); // 인스턴스 pool
            config.setProviderName("SunJCE");
            config.setSaltGeneratorClassName("org.jasypt.salt.RandomSaltGenerator"); // salt 생성 클래스
            config.setIvGeneratorClassName("org.jasypt.iv.NoIvGenerator"); // PBEWithMD5AndDES 사용시에는 이걸 해줘야함
            config.setStringOutputType("base64"); //인코딩 방식
            encryptor.setConfig(config);
            return encryptor;
        }
}
 
cs


별로 어려운 것 없이 이거 하나 구현해주면 다 끝난다. 그럼 암호화된 properties의 값들을 복호화해서 쓰게 됨.

자 그럼 데이터를 어떻게 암호화 하냐면,


3. Junit Test

1
2
3
4
5
6
7
8
9
10
11
12
13
14
15
16
17
18
19
20
21
22
23
24
25
26
package com.test;
 
import org.jasypt.encryption.pbe.StandardPBEStringEncryptor;
 
public class Test {
 
    @org.junit.Test
    public void test() {
            String url = "jdbc:mariadb://127.0.0.1:3306/mysql";
            String username = "root";
            String password = "1234";
 
            System.out.println(jasyptEncoding(url));
            System.out.println(jasyptEncoding(username));
            System.out.println(jasyptEncoding(password));
        }
 
        public String jasyptEncoding(String value) {
 
            String key = "sssss";
            StandardPBEStringEncryptor pbeEnc = new StandardPBEStringEncryptor();
            pbeEnc.setAlgorithm("PBEWithMD5AndDES");
            pbeEnc.setPassword(key);
            return pbeEnc.encrypt(value);
        }
}
cs


난 그냥 junit test로 돌렸는데 아무 클래스 하나 파고 하드코딩(?)같이 해서 암호화 돌려도 상관없다.

algorithm의 경우에는 고객사에서 사용하는 방식으로 적용했고, key는 복호화할때도 써야하는것이니까 잘 보관해야 한다.

쟤네들을 암호화 하면 salt값 포함, 다음과 같은 값이 추출된다.


4. application.properties

1
2
3
4
5
6
7
8
9
10
11
12
13
14
15
16
17
18
19
spring.datasource.driver-class-name=org.mariadb.jdbc.Driver
 
#암호화 적용
spring.datasource.url=ENC(VIM2Q6Cr058I98tDUqk9t5AzhbOBtg7prpvmLVo4RMMAvb0vIvzPnggGZlJMOXmH)
spring.datasource.username=ENC(AGGJxx/HldORQzlVuuGTXQ==)
spring.datasource.password=ENC(mCuZLaeAjXHejmp6gW4Yuw==)
 
#암호화 미적용
#spring.datasource.url=jdbc:mariadb://127.0.0.1:3306/mysql
#spring.datasource.username=root
#spring.datasource.password=1234
 
#JasyptConfig 에서 설정한 BeanName
jasypt.encryptor.bean=jasyptStringEncryptor
#JasyptConfig 에서 사용할 passkey
password=sssss
 
jasypt.encryptor.iv-generator-classname=org.jasypt.iv.NoIvGenerator
 
cs

주석에 내용이 다 달려있어서 문제는 없다.

다만, PBEWithMd5AndDES 암호화를 사용하는 경우 datasource.password를 복호화하지 못하는 이슈가 발생하였고, 

JasyptConfig 에 iv-generator-classname을 위와 같이 설정해주어야 한다.

properties에 설정해도 먹히기도 하고, 안먹히기도 한다. 뭐야 이거 양자역학이야?


이 이슈는 위의 암호화 방식만 해당되는 내용이므로 다른 방식으로 적용할 경우에는 문제가 없을것이라 판단된다.

반응형
블로그 이미지

김생선

세상의 모든것을 어장관리

,
반응형

몇년만에 밑바닥부터 SpringBoot를 설정해서 개발하는지 모르겠다. 이하는 추후 활용을 위한 개인 기록용.


1. pom.xml

1
2
3
4
5
6
7
8
9
10
11
12
13
14
15
16
17
18
19
20
21
22
23
(중략)
 
<!-- Spring Boot 2.7.8 버전으로 활용 -->
<parent>
    <groupId>org.springframework.boot</groupId>
    <artifactId>spring-boot-starter-parent</artifactId>
    <version>2.7.8</version>
    <relativePath/> <!-- lookup parent from repository -->
</parent>
 
<!-- Mybatis Maven -->
<dependency>
    <groupId>org.mybatis.spring.boot</groupId>
    <artifactId>mybatis-spring-boot-starter</artifactId>
    <version>2.3.2</version>
</dependency>
 
<!-- Maria DB -->
<dependency>
    <groupId>org.mariadb.jdbc</groupId>
    <artifactId>mariadb-java-client</artifactId>
    <version>2.7.11</version>
</dependency>
cs


maven dependency는 대략적으로 위와 같이 잡아주었다.


2. TestMapper.java / TestService.java / TestServiceImpl.java / TestController.java / TestSql.xml

1
2
3
4
5
6
7
8
9
10
package com.test.common.mapper;
 
import org.apache.ibatis.annotations.Mapper;
 
 
@Mapper
public interface TestMapper {
    public String getSysDate();
}
 
cs


1
2
3
4
5
6
package com.test.comm.service;
 
public interface TestService {
    String getSysdate();
}
 
cs


1
2
3
4
5
6
7
8
9
10
11
12
13
14
15
16
17
18
19
20
21
package com.test.comm.service.impl;
 
import org.springframework.beans.factory.annotation.Autowired;
import org.springframework.stereotype.Service;
 
import com.test.comm.service.TestService;
import com.test.common.mapper.TestMapper;
 
@Service
public class TestServiceImpl implements TestService {
    @Autowired
    TestMapper testMapper;
    
    @Override
    public String getSysdate() {
        String result = testMapper.getSysDate();
        return result;
    }
 
}
 
cs


1
2
3
4
5
6
7
8
9
10
11
12
13
14
15
16
17
18
19
20
21
22
23
24
25
package com.test.comm;
 
import org.springframework.beans.factory.annotation.Autowired;
import org.springframework.web.bind.annotation.PostMapping;
import org.springframework.web.bind.annotation.RequestBody;
import org.springframework.web.bind.annotation.ResponseBody;
import org.springframework.web.bind.annotation.RestController;
 
import com.test.comm.service.TestService;
 
@RestController
public class testController {
    @Autowired
    TestService testService;
    
    @PostMapping("/test")
    public String test(@RequestBody String a) {
        String result = "";
        result = testService.getSysdate();
        System.out.println("============= :::: " +result);
        return null;
    }
    
}
 
cs
 
 
1
2
3
4
5
6
7
8
<?xml version="1.0" encoding="UTF-8"?>
<!DOCTYPE mapper PUBLIC "-//mybatis.org//DTD Mapper 3.0//EN" "http://mybatis.org/dtd/mybatis-3-mapper.dtd">
 
<mapper namespace="com.test.common.mapper.TestMapper">
    <select id="getSysDate" resultType="java.lang.String">
        select sysdate() from dual
    </select>
</mapper>
cs


1
mybatis.mapper-locations=mapper/**/*.xml
cs


패키지 구조는 다음과 같다.

com.test.comm.TestController.java

com.test.comm.service.TestService.java

com.test.comm.service.impl.TestServiceImpl.java

com.test.common.mapper.TestMapper.java

src.main.resources.mapper.TestSql.xml


application.properties 에는 mybatis.mapper-locations 을 설정해준다.


오류가 난 상황으로는 SpringBoot 2.7.8 버전에서 mybatis-spring-boot-starter를 3.x 버전으로 설정해주었더니, TestServiceImpl 에서 @Autowired로 설정한 TestMapper.java를 인식할 수 없다는 오류가 발생했었다.

여러 시행착오 끝에 SpringBoot 2.7.8과 mybatis-spring-boot-starter 3.x과 호환이 안되는것을 인지하고, 현재는 2.x 버전대로 맞추어주었다.


에혀 힘들었다.

반응형
블로그 이미지

김생선

세상의 모든것을 어장관리

,