반응형

회사에서 자체적으로 제작한 Spring 기반의 프레임워크/튜닝 Eclipse로 개발을 할 일이 생겼는데, 쿼리 작성하는 xml이 뭔가 좀... 다르다? 

대충 내가 지금까지 써온 xml 형태랑 다르다. 


쓰다보니 가장 큰 문제가 바로 Ctrl-z / Ctrl-y를 이용한 되돌리기 기능이 안먹힌다는 것인데, 이러다보니 뭐 하나 잘못 지워버리면 되돌리기가 안되서 -_-;; 아주 난감했다. 어떻게 이 상태로 한 달을 개발했는지 모르겠는데.


아무튼 구글링을 대충 Eclipse xml 되돌리기 로 검색해보니 원인을 찾을 수 있었다.

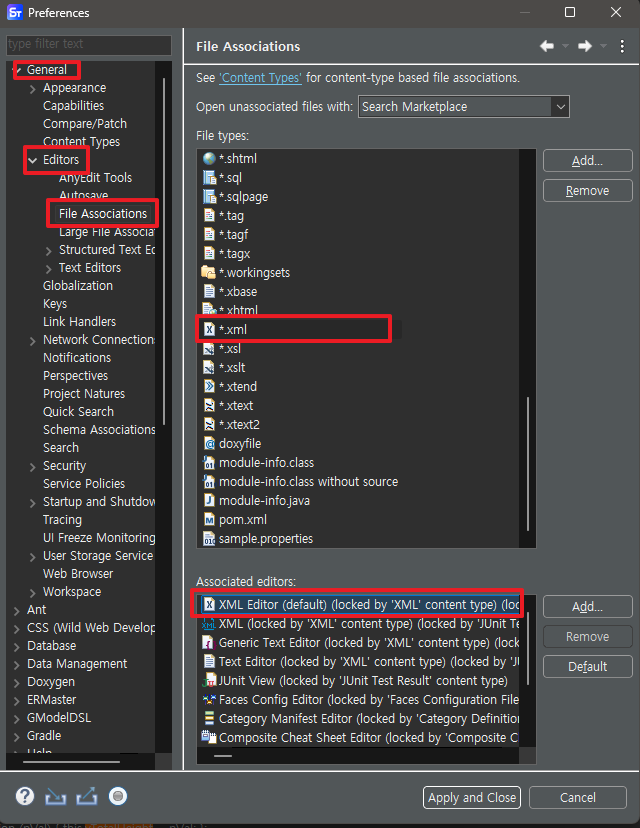
원인은 '기본 xml 열기 속성이 XML (Spring XML Config File)로 설정' 되어 있었던 것. 이것을 XML Editor로 변경해주니 아주 잘 동작한다.


그래 이렇게 등록되어야 tag 자동완성도 되고 좋지. ㅋㅋㅋ


설정 방법은 다음과 같다. 


Windows -> Preferences -> General -> Editors -> File Associations -> *.xml -> XML Editor 선택 후, Default 클릭.

이렇게 설정하면 XML 에디터로 열려 태그 자동완성부터 시작해서 안먹히던 되돌리기/복구하기도 잘 되고. 코드하이라이터(?)도 잘 보이고 아무튼 좋다. ㅋㅋㅋ 아 진짜 별놈의 설정이 다 있었네. ㅋㅋㅋㅋ 

반응형
블로그 이미지

김생선

세상의 모든것을 어장관리

,
반응형

갑자기 몇년만에 웹 개발을 지원요청받아서 투입되었다. 거기에 생전 처음보는 울 회사 자체 프레임워크로 커스터마이징된 SpringBoot 기반 프레임워크;; 아 이건 또 뭐야. 대체.


아무튼 개발 잘 하고 있는데 엑셀 파싱하고 sysout 으로 출력하는데 한글 인코딩이 깨져서 보인다. 다른 한글들은 잘 출력되는걸 봐서 뭔가 문제가 있는것 같은데, 일단 급한대로 한글이 잘 나오는데만 초점을 두고 GPT 에게 물어보았다.


DATA ROW : 1 : �� ,,,,,, : [Lv, ����ID, ��������, ��ȹ, ����, ����, �����, ����, ��ȹ������, ��ȹ������, ����������, ����������, ���⹰, ���, �޼���]
DATA ROW : 2 : �� ,,,,,, : [4, PJ_001_IFT_001_002_001, �����û, 92.86%, 90.91%, ������, , , 2024-10-01, 2024-10-15, 2024-10-04, , , ������?����, ]

이렇게 보이는 상황 -_-;

디버깅 모드로 찍어보니 오브젝트 내의 데이터들은 모두 한글로 잘 가져온 상황. 그러니까 파싱문제는 아니다, 이마리야.


일단은 Run Configuration의 VM Argument를 -Dfile.encoding=UTF-8 로 준다거나 하는 설정은 싹 다 줘봤고, windows - preference 의 text encoding 같은것도 UTF-8로 줬는데 문제가 해결되지는 않았다.

다른방법을 더 강구하니 이거 함 써보라고 던져준다.


1
2
3
4
5
try {
    System.setOut(new PrintStream(System.outtrue"UTF-8"));
catch (UnsupportedEncodingException e) {
        e.printStackTrace();
}
cs


일단 이렇게 하니까 잘 나온다. 원인 분석까지는 시간이 조금 걸릴듯. 이런건 또 생전 첨보네 ㅡㅡ;; 

반응형
블로그 이미지

김생선

세상의 모든것을 어장관리

,
반응형

알리에서 업무용으로 매크로 키보드를 구매했다.

구매하고나서는 셀러에게 연락해서 별도 키보드 매핑 프로그램을 전송해달라고 요청해야하는데, 이게 뭐 악성코드가 있을 줄 알고 조마조마한게 한두번이 아닌데다, 프로그램에 따라 다른데 해당 매크로 키보드의 USB 전원을 뽑기라도 하면 그냥바로 초기화가 된다거나 하는 문제가 발생하는게 한두번이 아니다.


내가 구매한 키보드는 다음과 같은 3Key 1Knob 제품이다.


그래서 구글을 뒤져보니 해외 능력자 형님께서 깃헙에 프로그램과 대략적인 사용설명서를 올려두셨다. 깃헙 바로 가보자.

https://github.com/kriomant/ch57x-keyboard-tool/releases


Releases · kriomant/ch57x-keyboard-tool

Utility for programming ch57x small keyboard. Contribute to kriomant/ch57x-keyboard-tool development by creating an account on GitHub.

github.com


그리고 이를 실행하기 위해서는 USB 키보드 개발킷의 일종인 USBDK를 설치해야한다.

아래의 링크에서 설치가 가능하다.

https://github.com/daynix/UsbDk/releases


Releases · daynix/UsbDk

Usb Drivers Development Kit for Windows. Contribute to daynix/UsbDk development by creating an account on GitHub.

github.com


USBDK를 설치하였다면, ch57 release 에서 OS 버전에 맞게 압축파일을 다운로드 한다. 나는 Windows OS 이기 때문에 ch57x-keyboard-tool-x86_64-pc-windows-msvc.zip 를 다운로드 했다.


기본적인 설명은 메인 페이지에 다 들어 있어서 어렵지는 않고, 파워쉘을 이용해 yaml 파일을 업로드하는 방식으로 매핑이 진행된다.


간단하게 내가 사용하는 위 키보드 기준으로, 설정은 다음과 같다.

orientation: normal

rows: 1
columns: 3
knobs: 1

layers:
  - buttons:
      # Multimedia commands are also supported. They cannot be mixed with
      # normal keys and modifiers.
      # 이클립스 새파일 / 이클립스 git commit / 스프링부트런
      - ["ctrl-n", "ctrl-shift-3" , "alt-shift-x,b"]
    knobs:
      - ccw: 'shift-wheelup'
        press: 'alt-shift-x,m'
        cw: 'shift-wheeldown'

# LED 끄기
#ch57x-keyboard-tool led 0
# LED 누른 키만 켜기
#ch57x-keyboard-tool led 1
# LED 순차켜짐
#ch57x-keyboard-tool led 2

# shift-wheelup - 왼쪽 가로스크롤
# shift-wheeldown - 오른쪽 가로스크롤


파워쉘에서의 대략적인 명령어는 다음과 같다.


./ch57x-keyboard-tool show-keys - 지원되는 키 리스트 확인

./ch57x-keyboard-tool validate your-config.yaml - yaml 설정파일 검증

./ch57x-keyboard-tool upload your-config.yaml - yaml 설정파일 업로드


일단은 내가 쓰는 키보드는 잘 동작한다. 아, 이거 도네라도 해야하나. 아무튼 참 감사한 일. 


반응형
블로그 이미지

김생선

세상의 모든것을 어장관리

,
반응형

CentOS 7 설치 후 yum update -y 하는데 오류가 발생했다.

[root@0370a17ebb47 /]# yum update -y
Loaded plugins: fastestmirror, ovl
Loading mirror speeds from cached hostfile
Could not retrieve mirrorlist http://mirrorlist.centos.org/?release=7&arch=x86_64&repo=extras&infra=container error was
14: curl#6 - "Could not resolve host: mirrorlist.centos.org; Unknown error"


 One of the configured repositories failed (Unknown),
 and yum doesn't have enough cached data to continue. At this point the only
 safe thing yum can do is fail. There are a few ways to work "fix" this:

     1. Contact the upstream for the repository and get them to fix the problem.

     2. Reconfigure the baseurl/etc. for the repository, to point to a working
        upstream. This is most often useful if you are using a newer
        distribution release than is supported by the repository (and the
        packages for the previous distribution release still work).

     3. Run the command with the repository temporarily disabled
            yum --disablerepo=<repoid> ...

     4. Disable the repository permanently, so yum won't use it by default. Yum
        will then just ignore the repository until you permanently enable it
        again or use --enablerepo for temporary usage:

            yum-config-manager --disable <repoid>
        or
            subscription-manager repos --disable=<repoid>

     5. Configure the failing repository to be skipped, if it is unavailable.
        Note that yum will try to contact the repo. when it runs most commands,
        so will have to try and fail each time (and thus. yum will be be much
        slower). If it is a very temporary problem though, this is often a nice
        compromise:

            yum-config-manager --save --setopt=<repoid>.skip_if_unavailable=true

Cannot find a valid baseurl for repo: extras/7/x86_64


아 이게 뭔가 하고 찾아보니 CentOS7 지원중단에 따른 미러사이트 오류로 확인되었고, 아래와 같은 수정을 통해 yum update를 수행했다. #ori 항목은 기존의 설정으로 주석처리하고, #new 항목을 신규로 작성하면 된다.

[root@0370a17ebb47 /]# vi /etc/yum.repos.d/CentOS-Base.repo

[base]
name=CentOS-$releasever - Base
# ori
#mirrorlist=http://mirrorlist.centos.org/?release=$releasever&arch=$basearch&repo=os&infra=$infra
#baseurl=http://mirror.centos.org/centos/$releasever/os/$basearch/
# new
baseurl=http://centos.mirror.cdnetworks.com/7/os/x86_64
gpgcheck=1
enabled=1
gpgkey=file:///etc/pki/rpm-gpg/RPM-GPG-KEY-CentOS-7

#released updates
[updates]
name=CentOS-$releasever - Updates
# ori
#mirrorlist=http://mirrorlist.centos.org/?release=$releasever&arch=$basearch&repo=updates&infra=$infra
#baseurl=http://mirror.centos.org/centos/$releasever/updates/$basearch/
#gpgcheck=1
#gpgkey=file:///etc/pki/rpm-gpg/RPM-GPG-KEY-CentOS-7
# new
baseurl=http://centos.mirror.cdnetworks.com/7/updates/x86_64
gpgcheck=1
enabled=1
gpgkey=file:///etc/pki/rpm-gpg/RPM-GPG-KEY-CentOS-7

#additional packages that may be useful
[extras]
name=CentOS-$releasever - Extras
# ori 
#mirrorlist=http://mirrorlist.centos.org/?release=$releasever&arch=$basearch&repo=extras&infra=$infra
#baseurl=http://mirror.centos.org/centos/$releasever/extras/$basearch/
# new 
baseurl=http://centos.mirror.cdnetworks.com/7/extras/x86_64
gpgcheck=1
gpgkey=file:///etc/pki/rpm-gpg/RPM-GPG-KEY-CentOS-7

#additional packages that extend functionality of existing packages
[centosplus]
name=CentOS-$releasever - Plus
# ori
#mirrorlist=http://mirrorlist.centos.org/?release=$releasever&arch=$basearch&repo=centosplus&infra=$infra
#baseurl=http://mirror.centos.org/centos/$releasever/centosplus/$basearch/
# new
baseurl=http://centos.mirror.cdnetworks.com/7/centosplus/x86_64
gpgcheck=1
enabled=0
gpgkey=file:///etc/pki/rpm-gpg/RPM-GPG-KEY-CentOS-7


그 후에 정상 업데이트가 됨을 확인할 수 있다.

[root@0370a17ebb47 /]# yum update -y
Loaded plugins: fastestmirror, ovl
Loading mirror speeds from cached hostfile
base                                                                           | 3.6 kB  00:00:00
extras                                                                         | 3.4 kB  00:00:00
updates                                                                        | 3.4 kB  00:00:00
(1/4): base/group_gz                                                           | 166 kB  00:00:00
(2/4): extras/primary_db                                                       | 156 kB  00:00:00
(3/4): updates/primary_db                                                      | 1.3 MB  00:00:00
(4/4): base/primary_db                                                         | 6.0 MB  00:00:00
No packages marked for update
반응형
블로그 이미지

김생선

세상의 모든것을 어장관리

,
반응형

OS 변경설치를 위해 개인적으로 테스트하기 위해 작성한다.


1. 테스트 데이터 베이스 생성 및 테스트 계정 생성

먼저 테스트용 서버에 PostgreSQL 13을 설치, 신규 데이터베이스 생성과 신규 계정을 생성한다.

만약 순서가 잘못된다면 권한과 관련해서 조금 많이 꼬여버리니까 주의해야한다. 모든 내용은 psql 명령어로 수행했다. 

# psql 명령어를 이용하여 postgres 계정에 접속
[postgres@82559cbe0973 data]$ psql -h localhost -p 18081
psql (13.16)
Type "help" for help.
postgres=#

# 계정 및 비밀번호 생성
postgres=# create user [계정명] with password '[비밀번호]';
CREATE ROLE

# 데이터베이스 생성 후, 계정 권한 부여
postgres=# create database [데이터베이스명];
CREATE DATABASE

#해당 계정에 해당 데이터베이스의 모든 권한 부여
postgres=# grant all privileges on database [데이터베이스명] to [계정명];
GRANT

#생성 후 exit 로 psql 종료, 신규로 생성한 계정으로 접속
postgres=# exit
[postgres@82559cbe0973 data]$ psql -U [계정명] -d [데이터베이스명] -h localhost -p 18081
psql (13.16)
Type "help" for help.

kimfishs=>


2. 신규 테이블 생성 및 데이터 입력

여기서부터는 일반 SQL 쿼리와 크게 다르지 않다. 사실 위의 grant 명령어들도 SQL 이나 다를바 없긴 하지만 뭐...

# 테이블 생성, 해당 테이블에 접속할 계정으로 생성해야 한다
kimfishs=> create table [테이블명] ( [컬럼명] varchar(50) , ... [컬럼명n] varchar (50)) ;
CREATE TABLE

# 테이블에 데이터 입력
kimfishs=> insert into [테이블명] ( id , name ) values ( 'kimfish', '리고기');
INSERT 0 1

# 테이블 데이터 조회
kimfishs=> select * from [테이블명] ;
   id    |  name
---------+--------
 kimfish | 리고기
(1 row)


처음에 postgres로 테이블 생성하고 이후에 DBEaver로 신규생성계정으로 접속하니 권한이 없어 select도 못하는 상황이 존재했다. 이후에 권한문제임을 깨닫고 접속 자체를 신규계정으로 접속, create table 명령어를 수행하는 방식으로 재설정했다.


3. PostgreSQL 데이터 베이스 백업 및 복구

임시데이터들도 모두 갖춰졌겠다, 이젠 해당 데이터베이스 설정 및 파일들을 모두 tar 압축백업을 할 예정이다.

그리고 신규 서버에 OS 설치 후 이걸 고대로 갖다 놓았을 때 정상적으로 접속이 되는지 확인할 것이다.


아마도 PostgreSQL 버전이 같다면 큰 문제 없이 수행되리라 예상하고 있다.


일단 PostgreSQL 설정파일 및 데이터베이스 파일이 위치해있는 디렉토리로 이동, tar 압축을 수행한다.

# PostgreSQL의 기본 설정 디렉토리는 /var/lib/pgsql 에 위치해있다
[root@82559cbe0973 lib]# cd /var/lib
[root@82559cbe0973 lib]# ls
alternatives  dnf    misc   private  rpm-state  systemd
dbus          games  pgsql  portables       rpm      selinux    tpm
[root@82559cbe0973 lib]# tar -cvf pgsql_back.tar pgsql
[root@82559cbe0973 lib]# ls
alternatives  dnf    misc   pgsql_back.tar  private  rpm-state  systemd
dbus          games  pgsql  portables       rpm      selinux    tpm

생성된 tar파일을 고대로 다운로드 한 후, 신규 서버에 업로드한다.


https://kimfish.tistory.com/361


[PostgreSQL13] PostgreSQL 13 설치하기

Docker에 설치된 RockyLinux 8.10 버전에 PostgreSQL 13을 설치 후 데이터 이관 테스트를 진행하려 한다.Docker에서 PostgreSQL 13을 설치할 때에는 몇가지 추가로 설정해줘야 할 것들이 있어 정리할 겸 작성한

kimfish.co.kr

이 내용을 참조하여 신규 서버에 PostgreSQL을 설치한 후, tar 파일을 업로드 한 이후, 다음의 과정을 수행한다.

#자세히 보면 서버가 다르다
[root@93e37f9f73ea lib]# ls
alternatives  dbus  games  misc          private  rpm-state  systemd
dav           dnf   httpd  pgsql_back.tar  portables   rpm      selinux    tpm
[root@93e37f9f73ea lib]#
[root@93e37f9f73ea lib]# tar -xvf pgsql_back.tar
pgsql/
pgsql/.bash_profile
pgsql/.bash_history
pgsql/.psql_history
pgsql/13/
pgsql/13/data/

(중략)

[root@93e37f9f73ea lib]# ls
alternatives  dbus  games  misc   pgsql_back.tar  portables  rpm        selinux  tpm
dav           dnf   httpd  pgsql      private    rpm-state  systemd
[root@93e37f9f73ea lib]# cd pgsql/13/data
[root@93e37f9f73ea data]# ls
PG_VERSION        log           pg_ident.conf  pg_replslot   pg_stat_tmp  pg_wal                postmaster.opts
base              pg_commit_ts  pg_logical     pg_serial     pg_subtrans  pg_xact               postmaster.pid
current_logfiles  pg_dynshmem   pg_multixact   pg_snapshots  pg_tblspc    postgresql.auto.conf
global            pg_hba.conf   pg_notify      pg_stat       pg_twophase  postgresql.conf

# 이전 서버에서 접속포트를 18081로 설정했는데, 그대로 잘 압축해제 되었는지 확인
# 의도적으로 18081 에서 8084로 변경후 실행해본다.

[postgres@93e37f9f73ea data]$ vi postgresql.conf

#------------------------------------------------------------------------------
# CONNECTIONS AND AUTHENTICATION
#------------------------------------------------------------------------------

# - Connection Settings -

listen_addresses = '*'          # what IP address(es) to listen on;
                                        # comma-separated list of addresses;
                                        # defaults to 'localhost'; use '*' for all
                                        # (change requires restart)
port = 8084                             # (change requires restart)


# PostgreSQL 서버 실행
[postgres@93e37f9f73ea data]$ /usr/pgsql-13/bin/pg_ctl -D /var/lib/pgsql/13/data start
pg_ctl: another server might be running; trying to start server anyway
waiting for server to start....2024-08-21 07:36:04.797 UTC [6143] LOG:  redirecting log output to logging collector process
2024-08-21 07:36:04.797 UTC [6143] HINT:  Future log output will appear in directory "log".
 done
server started


뭐 그런데 결과가 당연하게도, 잘 구동 되었다.


문제는 기존 PostgreSQL 설정파일의 위치나 데이터베이스 파일, 테이블 스페이스 경로 등이 커스텀화 되지 않았는지 파악하는것이 가장 중요하다.

다음에는 직접 PostgreSQL 서버에 접속 후, 각종 테이블스페이스와 데이터베이스 설정 위치들을 쿼리를 통해 알아볼 예정이다.


반응형
블로그 이미지

김생선

세상의 모든것을 어장관리

,
반응형

얼마전에 docker linux에 PostgreSQL13 Server를 설치하였고 DBEaver를 통한 접속테스트를 수행했다.

이번에는 신규 계정 생성 및 TableSpace 생성, 기본적인 임시 테이블 서너개를 생성 후 백업 테스트를 위한 준비를 수행해볼 예정이다.

DB의 admin 계정으로 접속해서 직접 쿼리로 관리해도 되지만, 이번에는 새로운 방법(?)으로 해보려 했다.


아래의 순서는 다음과 같다.

데이터베이스 설정 - 테이블스페이스 설정 - 계정 생성 및 권한 설정


1. psql 접속 

docker linux에 접속 후, postgres 계정으로 변경한다.

이후, 설정에 따라 다르지만 아래의 명령어를 통해 psql에 접속한다.

# PostgreSQL 이 기본 포트로 동작하는 경우
[postgres@82559cbe0973 data]$ psql

#PostgreSQL 이 다른 포트로 동작하는 경우
[postgres@82559cbe0973 data]$ psql -h localhost -p [포트]


2. 데이터베이스 설정

이제 막 PostgreSQL을 설치했으므로 기본 데이터베이스 외에는 존재하지 않으므로, 데이터베이스 생성부터 수행한다.

다음과 같이 명령어를 입력한다.

create database [DB명];

\l 명령어는 생성된 database를 확인하는 명령어이다.

postgres=# create database kimfish_database;
CREATE DATABASE
postgres=# \l
                                 List of databases
       Name       |  Owner   | Encoding | Collate |  Ctype  |   Access privileges
------------------+----------+----------+---------+---------+-----------------------
 kimfish_database | postgres | UTF8     | C.UTF-8 | C.UTF-8 |
 postgres         | postgres | UTF8     | C.UTF-8 | C.UTF-8 |
 template0        | postgres | UTF8     | C.UTF-8 | C.UTF-8 | =c/postgres          +
                  |          |          |         |         | postgres=CTc/postgres
 template1        | postgres | UTF8     | C.UTF-8 | C.UTF-8 | =c/postgres          +
                  |          |          |         |         | postgres=CTc/postgres
(4 rows)


3. DB 계정 생성 및 권한 부여

#계정 생성

postgres=# create user [계정 아이디] with password '[비밀번호]';
CREATE ROLE

#계정에 데이터베이스 권한 부여
postgres=# grant connect on database [데이터베이스명] to [계정 아이디];
GRANT
postgres=# \l
                                 List of databases
       Name       |  Owner   | Encoding | Collate |  Ctype  |   Access privileges
------------------+----------+----------+---------+---------+-----------------------
 kimfish_database | postgres | UTF8     | C.UTF-8 | C.UTF-8 | =Tc/postgres         +
                  |          |          |         |         | postgres=CTc/postgres+
                  |          |          |         |         | kimfish=c/postgres
 postgres         | postgres | UTF8     | C.UTF-8 | C.UTF-8 |
 template0        | postgres | UTF8     | C.UTF-8 | C.UTF-8 | =c/postgres          +
                  |          |          |         |         | postgres=CTc/postgres
 template1        | postgres | UTF8     | C.UTF-8 | C.UTF-8 | =c/postgres          +
                  |          |          |         |         | postgres=CTc/postgres
(4 rows)


여기까지 기본적인 PostgreSQL 설정이 모두 완료되었다.

DBEaver를 통해 접속했을 때 정상적으로 보여지는 것 또한 확인했다.

반응형
블로그 이미지

김생선

세상의 모든것을 어장관리

,
반응형

Docker에 설치된 RockyLinux 8.10 버전에 PostgreSQL 13을 설치 후 데이터 이관 테스트를 진행하려 한다.

Docker에서 PostgreSQL 13을 설치할 때에는 몇가지 추가로 설정해줘야 할 것들이 있어 정리할 겸 작성한다.


Docker에서 설치할 때의 에러 및 해결방법을 같이 작성하니, 일반 서버OS(Docker가 아닌)에서는 불필요한 내용도 다소 존재한다.


1. PostgreSQL Repository 등록

다음의 명령어로 공식 Repository를 등록한다.

yum install -y https://download.postgresql.org/pub/repos/yum/reporpms/EL-8-x86_64/pgdg-redhat-repo-latest.noarch.rpm

[root@93e37f9f73ea pgsql]# yum install -y https://download.postgresql.org/pub/repos/yum/reporpms/EL-8-x86_64/pgdg-redhat-repo-latest.noarch.rpm

PostgreSQL common RPMs for RHEL / CentOS 8 - x86_64                  2.3 MB/s | 2.4 kB     00:00
PostgreSQL common RPMs for RHEL / CentOS 8 - x86_64                  560  B/s | 659  B     00:01
PostgreSQL common RPMs for RHEL / CentOS 8 - x86_64                  2.3 MB/s | 2.4 kB     00:00
PostgreSQL common RPMs for RHEL / CentOS 8 - x86_64                  552  B/s | 659  B     00:01
Error: Failed to download metadata for repo 'pgdg-common': repomd.xml GPG signature verification error: Bad GPG signature

위 오류는 GPG 서명검증 실패 오류로, 다음의 명령어로 재시도한다.


yum install -y --nogpgcheck https://download.postgresql.org/pub/repos/yum/reporpms/EL-8-x86_64/pgdg-redhat-repo-latest.noarch.rpm

[root@93e37f9f73ea pgsql]# yum install -y --nogpgcheck https://download.postgresql.org/pub/repos/yum/reporpms/EL-8-x86_64/pgdg-redhat-repo-latest.noarch.rpm

PostgreSQL common RPMs for RHEL / CentOS 8 - x86_64                  244 kB/s | 468 kB     00:01
pgdg-redhat-repo-latest.noarch.rpm                                    20 kB/s |  15 kB     00:00
Dependencies resolved.
=====================================================================================================
 Package                     Architecture      Version                 Repository               Size
=====================================================================================================
Upgrading:
 pgdg-redhat-repo            noarch            42.0-43PGDG             @commandline             15 k

Transaction Summary
========================================================================================================================
Install  1 Package

Total size: 15 k
Installed size: 15 k
Downloading Packages:
Running transaction check
Transaction check succeeded.
Running transaction test
Transaction test succeeded.
Running transaction
  Preparing        :                                                                                                1/1
  Installing       : pgdg-redhat-repo-42.0-43PGDG.noarch                                                            1/1
  Verifying        : pgdg-redhat-repo-42.0-43PGDG.noarch                                                            1/1

Installed:
  pgdg-redhat-repo-42.0-43PGDG.noarch

Complete!


2. 기본 PostgreSQL 모듈 비활성화

RockyLinux 8.10 버전에서는 기본 PostgreSQL 모듈 활성화가 되어있으니, 비활성화 작업을 거친다.

이 작업은 약간의 시간을 소요한다.


yum module disable -y postgresql

[root@82559cbe0973 /]# yum module disable -y postgresql

PostgreSQL common RPMs for RHEL / Rocky / AlmaLinux 8 - x86_64                          364  B/s | 659  B     00:01
PostgreSQL common RPMs for RHEL / Rocky / AlmaLinux 8 - x86_64                          2.4 MB/s | 2.4 kB     00:00
Importing GPG key 0x08B40D20:

(중략)

Dependencies resolved.
========================================================================================================================
 Package                     Architecture               Version                       Repository                   Size
========================================================================================================================
Disabling modules:
 postgresql

Transaction Summary
========================================================================================================================

Complete!


3. PostgreSQL 13 Server버전 설치

이제 PostgreSQL 13 Server를 설치한다.


yum install -y postgresql13 postgresql13-server

[root@82559cbe0973 /]# yum install -y postgresql13 postgresql13-server

Last metadata expiration check: 0:00:42 ago on Wed Aug 21 02:01:09 2024.
Dependencies resolved.
========================================================================================================================
 Package                            Architecture          Version                           Repository             Size
========================================================================================================================
Installing:
 postgresql13                       x86_64                13.16-2PGDG.rhel8                 pgdg13                1.5 M
 postgresql13-server                x86_64                13.16-2PGDG.rhel8                 pgdg13                5.5 M
Installing dependencies:
 libicu                             x86_64                60.3-2.el8_1                      baseos                8.8 M
 postgresql13-libs                  x86_64                13.16-2PGDG.rhel8                 pgdg13                420 k

Transaction Summary
========================================================================================================================
Install  4 Packages

(중략)

Installed:
  libicu-60.3-2.el8_1.x86_64                                postgresql13-13.16-2PGDG.rhel8.x86_64
  postgresql13-libs-13.16-2PGDG.rhel8.x86_64                postgresql13-server-13.16-2PGDG.rhel8.x86_64

Complete!


4. PostgreSQL 설정 및 구동

PostgreSQL DB 초기화 및 권한과 관련해서 설정을 진행해주어야 한다. 다음의 명령어를 수행한다.


4-1. PostgreSQL DB 초기화

해당 디렉토리가 존재하지 않는다면 해당 디렉토리를 생성한다.

존재한다면 이 단계는 건너뛰어도 된다.

[root@82559cbe0973 bin]# mkdir /var/lib/pgsql/13/data
[root@82559cbe0973 bin]# cd /var/lib/pgsql/13/data
[root@82559cbe0973 data]# pwd
/var/lib/pgsql/13/data


4-2. postgres 계정 권한부여 및 계정전환

PostgreSQL 13 을 설치하면 postgres 라는 계정이 생성된다. 해당 계정으로 PostgreSQL13을 구동하는 등, PostgreSQL 기능과 관련된 여러 동작을 수행한다.

해당 계정에 위 4-1. 디렉토리의 접근권한을 부여해준 후, 해당 계정으로 접속한다.

[root@93e37f9f73ea var]# chown postgres:postgres /var/lib/pgsql/13/data
[root@93e37f9f73ea var]#
[root@93e37f9f73ea var]# su - postgres


4-3. DB 클러스터 초기화

postgres 계정으로 아래의 명령어를 수행하여 DB 클러스터를 초기화해준다.

[postgres@93e37f9f73ea ~]$ /usr/pgsql-13/bin/initdb -D /var/lib/pgsql/13/data

The files belonging to this database system will be owned by user "postgres".
This user must also own the server process.

The database cluster will be initialized with locale "C.UTF-8".
The default database encoding has accordingly been set to "UTF8".
The default text search configuration will be set to "english".

Data page checksums are disabled.

fixing permissions on existing directory /var/lib/pgsql/13/data ... ok
creating subdirectories ... ok
selecting dynamic shared memory implementation ... posix
selecting default max_connections ... 100
selecting default shared_buffers ... 128MB
selecting default time zone ... Etc/UTC
creating configuration files ... ok
running bootstrap script ... ok
performing post-bootstrap initialization ... ok
syncing data to disk ... ok

initdb: warning: enabling "trust" authentication for local connections
You can change this by editing pg_hba.conf or using the option -A, or
--auth-local and --auth-host, the next time you run initdb.

Success. You can now start the database server using:

    /usr/pgsql-13/bin/pg_ctl -D /var/lib/pgsql/13/data -l logfile start


4-4. PostgreSQL 실행 및 중지

아래의 명령어를 통해 실행 또는 중지한다.

/usr/pgsql-13/bin/pg_ctl -D /var/lib/pgsql/13/data start 

/usr/pgsql-13/bin/pg_ctl -D /var/lib/pgsql/13/data stop

로그는 /var/lib/pgsql/13/data/log 경로에 위치해있다.


5. 호스트 PC에서 접속하기 위한 설정

Docker에서 PostgreSQL을 구동시켰으니 호스트PC인 Windows 에서 DBEaver를 통해 접속하려 한다. 꽤 많은(?) 삽질이 필요했는데, 아래의 방법을 진행하여 연결에 성공했다.


5-1. 접속 포트 설정

현재 Docker는 18081 포트로 포트포워딩이 설정된 상태이다. postgreSQL은 5432 포트가 기본포트이므로, 아래의 설정파일을 편집한다. 모든 과정은 postgres 계정으로 진행한다.

아래 항목 중, listen_address 항목을 모든 IP주소인 '*' 로 설정하고, port는 5432 에서 변경할 포트인 18081로 수정한다.

기본적으로 주석처리가 되어있으므로 주석 또한 해제한다.


postgresql 서버를 재시작해야 설정이 적용된다.

[postgres@82559cbe0973 data] cd /var/lib/pgsql/13/data
[postgres@82559cbe0973 data] vi postgresql.conf

(중략)

# - Connection Settings -

listen_addresses = '*'          # what IP address(es) to listen on;
                                        # comma-separated list of addresses;
                                        # defaults to 'localhost'; use '*' for all
                                        # (change requires restart)
port = 18081                            # (change requires restart)


5-2. 외부 접근 허용 정책 설정

외부 접근을 허용하는 정책을 설정하기 위해 같은 디렉토리에 있는 pg_hba.conf 파일을 열어준다.

최하단의 볼드체로 표시된 항목 두 개를 추가한다.


postgresql 서버를 재시작해야 설정이 적용된다.

[postgres@82559cbe0973 data] cd /var/lib/pgsql/13/data
[postgres@82559cbe0973 data] vi pg_hba.conf

(중략) 

# replication privilege.
local   replication     all                                     trust
host    replication     all             127.0.0.1/32            trust
host    replication     all             ::1/128                 trust
host    all     all             0.0.0.0/0               md5
host    all     all             ::/0                    md5


5-3. 기본계정 postgres 비밀번호 설정

어디에선가 본 것으로는 postgres 계정의 비밀번호는 postgres라던데 사실 아니었나보다 -_-;

그래서 직접 접속 후, postgres 계정의 비밀번호를 설정해준다.


위 5-1. 항목에서 5432 포트를 18081로 변경하였기 때문에, 기본 접속 명령어인 psql  명령어가 오류가 나게 된다.

이럴 때에는 당황하지 말고 변경한 포트설정 옵션을 넣어주어야 한다.

(오류 예시)
[postgres@82559cbe0973 data]$ psql
psql: error: could not connect to server: No such file or directory
        Is the server running locally and accepting
        connections on Unix domain socket "/run/postgresql/.s.PGSQL.5432"?


(포트변경 후 옵션 설정)
[postgres@82559cbe0973 data]$ psql -h localhost -p 18081
psql (13.16)
Type "help" for help.

postgres=#


접속이 되었다면 아래의 쿼리를 입력하여 비밀번호를 설정해주자.

postgres=# alter user postgres password 'test1!';
ALTER ROLE


그리고 DBEaver 에서 접속하면 정상적으로 접속됨을 확인할 수 있다.


DB를 로컬 Windows PC에는 많이 설치해보고 개발용으로 설정한 적은 많아도, Docker Linux에 세팅한 후 접속해보는 건 처음인것 같다. 여러모로 설정이 많아 헷갈리기도 하고 조금 많이 어렵기도 했다. 실제 Linux 서버에 설치하는건 조금 다를것이고, 보안을 고려한다면 외부 접속 설정 정책 부분도 손을 좀 더 봐야 할 것으로 예상된다. 뭐, 그래도 해본게 어딘가 싶긴 하지만 말이다.

반응형
블로그 이미지

김생선

세상의 모든것을 어장관리

,
반응형

개발서버로 쓰던 CentOS 가 지원중단이 되면서 RockyLinux로 OS를 변경하게 되었다.

SVN 도 이관대상이기 때문에 이전글에서 개인 놋북에 Docker로 RockyLinux를 설치 후 SVN 설정까지 모두 완료했었다.

[RockyLinux] svn 설치 및 실행, 연동까지. - https://kimfish.co.kr/359


[RockyLinux] svn 설치 및 실행, 연동까지.

RockyLinux에 SVN을 이관설치할 일이 생겼다. 아직 플젝 투입 전이라 외부에서 겸사겸사 테스트해보느라 쓰는 글.대충 환경은 다음과 같다. Windows PC에 docker로 RockyLinux8.10을 올리고, 여기에 svn을 설치

kimfish.co.kr


이번에는 이론상으로 생각해보던 SVN Repository를 tar 압축 후, 신규 서버에서 압축해제 했을 때 정상동작 하는지를 테스트 해보고자 한다. 스포일러를 조금 하자면, 같은 버전이라면 그냥 뭐 된다. 예상했던 결과이긴 하지만.

다른 버전의 경우에는 어디까지 호환되는지 궁금하긴 한데, 지금 이관 규칙 자체가 최대한 같은 버전이기 때문에 큰 문제의 여지는 없다고 판단된다.


1. SVN 저장소 경로 확인 및 tar 압축

리눅스 SVN 저장소는 저장소 디렉토리 하위에 SVN 설정들이 포함되어있는 형태로 구성된다. 이걸 통째로 압축하고, 신규 서버에서 동일하게 압축해제하면 될거라는 판단이 든다. 저장소 디렉토리를 확인 한 후, tar 압축을 수행한다.

[root@93e37f9f73ea /]# ls
bin  etc   lib    lost+found  mnt  proc  run   srv           svn_repository  testRepo  usr
dev  home  lib64  media       opt  root  sbin  svn_repo.tar  sys             tmp       var
[root@93e37f9f73ea /]# cd svn_repository
[root@93e37f9f73ea svn_repository]#
[root@93e37f9f73ea svn_repository]# ls
README.txt  conf  db  format  hooks  locks  svnserve.log
[root@93e37f9f73ea svn_repository]#  tar -cvf svn_repo.tar svn_repository


2. 신규 서버에 tar 압축해제 및 구동

svn_repo.tar 파일을 신규 서버에 업로드 후, tar 압축해제를 수행한다.

[root@82559cbe0973 /]# ls
bin  etc   lib    lost+found  mnt  proc  run   srv           sys  usr
dev  home  lib64  media       opt  root  sbin  svn_repo.tar  tmp  var
[root@82559cbe0973 /]# tar -xvf svn_repo.tar
svn_repository/
svn_repository/locks/
svn_repository/locks/db-logs.lock
(중략)
[root@82559cbe0973 /]# ls
bin  etc   lib    lost+found  mnt  proc  run   srv           svn_repository  tmp  var
dev  home  lib64  media       opt  root  sbin  svn_repo.tar  sys             usr


이제 svn 구동을 수행한다.

[root@82559cbe0973 /]# svnserve -d -r /svn_repository --listen-port 18081 --log-file /svn_repository/svnserve.log


3. Tortoise SVN Repo-Browser 확인

Tortoise SVN 으로 접속해서 기존 서버에서 생성한 사용자계정 및 Commit 된 이력을 확인한다.

잘 들어와 있넹.


4. 결론

그냥 뭐 잘 된다... 문제는 현재 기동중인 SVN 서버의 저장소 경로가 어디냐는 것이긴 한데, 이걸 파악하는게 먼저일것 같기는 하다.

사실 생각해보면 당연한게, SVN 설정의 모든부분(계정/Commit파일/메세지/권한/설정 등)은 SVN 저장소 경로의 하위에 모두 담겨있기 때문이다. 

반응형
블로그 이미지

김생선

세상의 모든것을 어장관리

,
반응형

RockyLinux에 SVN을 이관설치할 일이 생겼다. 아직 플젝 투입 전이라 외부에서 겸사겸사 테스트해보느라 쓰는 글.

대충 환경은 다음과 같다. Windows PC에 docker로 RockyLinux8.10을 올리고, 여기에 svn을 설치해서 Windows에서 테스트 해보는 식으로 진행해보았다.

기본적인 명령어는 생략하고, SVN 위주로 작성해본다.


Windows 11 Pro
Docker - RockyLinux 8.10
JDK - OpenJDK 1.8


1. SVN 설치

yum install -y subversion

[root@82559cbe0973 /]# yum install -y subversion
Rocky Linux 8 - AppStream                                             5.8 kB/s | 4.3 kB     00:00
Rocky Linux 8 - AppStream                                             7.5 MB/s |  11 MB     00:01
Rocky Linux 8 - BaseOS                                                7.8 kB/s | 4.3 kB     00:00
Rocky Linux 8 - BaseOS                                                5.7 MB/s | 6.0 MB     00:01
Rocky Linux 8 - Extras                                                4.7 kB/s | 3.1 kB     00:00
Rocky Linux 8 - Extras                                                 22 kB/s |  14 kB     00:00
Dependencies resolved.
======================================================================================================
 Package               Arch        Version                                       Repository      Size
======================================================================================================
Installing:
 subversion            x86_64      1.10.2-5.module+el8.7.0+1065+42200b2e         appstream      1.1 M
Installing dependencies:
 apr                   x86_64      1.6.3-12.el8                                  appstream      128 k
 apr-util              x86_64      1.6.1-9.el8                                   appstream      105 k
 libserf               x86_64      1.3.9-9.module+el8.7.0+1065+42200b2e          appstream       59 k
 subversion-libs       x86_64      1.10.2-5.module+el8.7.0+1065+42200b2e         appstream      1.5 M
 utf8proc              x86_64      2.6.1-3.module+el8.7.0+1065+42200b2e          appstream       72 k
Installing weak dependencies:
 apr-util-bdb          x86_64      1.6.1-9.el8                                   appstream       24 k
 apr-util-openssl      x86_64      1.6.1-9.el8                                   appstream       26 k
Enabling module streams:
 subversion                        1.10

Transaction Summary
======================================================================================================
Install  8 Packages

Total download size: 3.0 M
Installed size: 10 M
Downloading Packages:
(1/8): apr-util-1.6.1-9.el8.x86_64.rpm                                1.4 MB/s | 105 kB     00:00
(2/8): apr-util-openssl-1.6.1-9.el8.x86_64.rpm                        985 kB/s |  26 kB     00:00
(3/8): apr-util-bdb-1.6.1-9.el8.x86_64.rpm                            186 kB/s |  24 kB     00:00
(4/8): libserf-1.3.9-9.module+el8.7.0+1065+42200b2e.x86_64.rpm        1.7 MB/s |  59 kB     00:00
(5/8): apr-1.6.3-12.el8.x86_64.rpm                                    479 kB/s | 128 kB     00:00
(6/8): subversion-libs-1.10.2-5.module+el8.7.0+1065+42200b2e.x86_64.r 8.5 MB/s | 1.5 MB     00:00
(7/8): subversion-1.10.2-5.module+el8.7.0+1065+42200b2e.x86_64.rpm    5.9 MB/s | 1.1 MB     00:00
(8/8): utf8proc-2.6.1-3.module+el8.7.0+1065+42200b2e.x86_64.rpm       1.0 MB/s |  72 kB     00:00
------------------------------------------------------------------------------------------------------
Total                                                                 3.5 MB/s | 3.0 MB     00:00
Running transaction check
Transaction check succeeded.
Running transaction test
Transaction test succeeded.
Running transaction
  Preparing        :                                                                              1/1
  Installing       : apr-1.6.3-12.el8.x86_64                                                      1/8
  Running scriptlet: apr-1.6.3-12.el8.x86_64                                                      1/8
  Installing       : apr-util-bdb-1.6.1-9.el8.x86_64                                              2/8
  Installing       : apr-util-openssl-1.6.1-9.el8.x86_64                                          3/8
  Installing       : apr-util-1.6.1-9.el8.x86_64                                                  4/8
  Running scriptlet: apr-util-1.6.1-9.el8.x86_64                                                  4/8
  Installing       : libserf-1.3.9-9.module+el8.7.0+1065+42200b2e.x86_64                          5/8
  Running scriptlet: libserf-1.3.9-9.module+el8.7.0+1065+42200b2e.x86_64                          5/8
  Installing       : utf8proc-2.6.1-3.module+el8.7.0+1065+42200b2e.x86_64                         6/8
  Installing       : subversion-libs-1.10.2-5.module+el8.7.0+1065+42200b2e.x86_64                 7/8
  Running scriptlet: subversion-libs-1.10.2-5.module+el8.7.0+1065+42200b2e.x86_64                 7/8
  Installing       : subversion-1.10.2-5.module+el8.7.0+1065+42200b2e.x86_64                      8/8
  Running scriptlet: subversion-1.10.2-5.module+el8.7.0+1065+42200b2e.x86_64                      8/8
  Verifying        : apr-1.6.3-12.el8.x86_64                                                      1/8
  Verifying        : apr-util-1.6.1-9.el8.x86_64                                                  2/8
  Verifying        : apr-util-bdb-1.6.1-9.el8.x86_64                                              3/8
  Verifying        : apr-util-openssl-1.6.1-9.el8.x86_64                                          4/8
  Verifying        : libserf-1.3.9-9.module+el8.7.0+1065+42200b2e.x86_64                          5/8
  Verifying        : subversion-1.10.2-5.module+el8.7.0+1065+42200b2e.x86_64                      6/8
  Verifying        : subversion-libs-1.10.2-5.module+el8.7.0+1065+42200b2e.x86_64                 7/8
  Verifying        : utf8proc-2.6.1-3.module+el8.7.0+1065+42200b2e.x86_64                         8/8

Installed:
  apr-1.6.3-12.el8.x86_64
  apr-util-1.6.1-9.el8.x86_64
  apr-util-bdb-1.6.1-9.el8.x86_64
  apr-util-openssl-1.6.1-9.el8.x86_64
  libserf-1.3.9-9.module+el8.7.0+1065+42200b2e.x86_64
  subversion-1.10.2-5.module+el8.7.0+1065+42200b2e.x86_64
  subversion-libs-1.10.2-5.module+el8.7.0+1065+42200b2e.x86_64
  utf8proc-2.6.1-3.module+el8.7.0+1065+42200b2e.x86_64

Complete!


2. SVN 저장소 디렉토리 생성 및 저장소 생성

2-1. mkdir [저장소 디렉토리]

정해진 규칙은 크게 없어보이나, 나는 루트 디렉토리에 만들어주었다.

[root@82559cbe0973 /]# mkdir svn
[root@82559cbe0973 /]# ls
bin  etc   lib    lost+found  mnt  proc  run   srv  sys  usr
dev  home  lib64  media       opt  root  sbin  svn  tmp  var


2-2. svnadmin create [저장소 디렉토리]

해당 명령어를 입력하면 별다른 메시지가 출력되지는 않지만, 디렉토리에 들어가보면 SVN 관련 파일이 생성되어있음을 확인할 수 있다.

[root@82559cbe0973 /]# svnadmin create /svn
[root@82559cbe0973 /]# cd svn
[root@82559cbe0973 svn]# ls
README.txt  conf  db  format  hooks  locks


3. SVN 설정 변경 

3-1. SVN 구동설정 변경

conf 디렉토리 하위의 svnserve.conf 파일을 변경해준다.

[root@82559cbe0973 svn]# cd conf
[root@82559cbe0973 conf]# ls
authz  hooks-env.tmpl  passwd  svnserve.conf
[root@82559cbe0973 conf]# vi svnserve.conf


설정 파일이 매우 길어서 찾아서 변경하는것이 빠르다.

각 파라미터별로 주석이 되어있는 것들을 찾아 주석을 해제한다.

주의할 점은 단순히 주석만 삭제할 것이 아니라, 각 파라미터 앞의 공백문자열(스페이스바)도 제거해주어야 한다. 이걸로 삽질을 몇시간이나 했던지;

(중략)
[general]
anon-access = read
auth-access = write
password-db = passwd
realm = My First Repository
(생략)


3-2. SVN 계정 생성

SVN에 접속가능한 계정을 생성한다. 계정별 권한도 부여가 가능한데 이건 좀 더 나중에.

알아보니까 리눅스에서는 VisualSVN이 지원되지 않아서, 직접 계정별 권한을 생성해줘야 한다고 한다 -_-;

conf 디렉토리 하위의 passwd 파일을 변경해준다.

[root@82559cbe0973 conf]# vi passwd

(중략)
[users]
# harry = harryssecret
# sally = sallyssecret
# 아이디 = 비밀번호
test = test12!@ 

나는 test 계정에 test12!@ 비밀번호로 설정해주었다.


4. SVN 구동 및 확인하기

svn 구동은 다음과 같은 명령어로 수행한다. 

svnserve -d -r [저장소 디렉토리] --listen-port [사용포트] --log-file [로그디렉토리/파일명]

로그 및 포트를 변경하지 않는다면 해당 부분의 옵션은 사용하지 않아도 무방하다.

[root@82559cbe0973 conf]# svnserve -d -r /svn --listen-port 18081 --log-file /svn/svnserve.log

SVN에 왜 기본 로그를 사용하지 않는지는 조금 의문이긴 한데, 아무튼 해당 로그 디렉토리에 가보면 구동에 성공했다 뭐다 별로 표시도 안난다.

그러니까 직접 Windows PC 에서 SVN에 접속해보자.


SVN 툴로는 TortoiseSVN을 많이 사용한다. 난 이미 설치가 되어있다.

Windows 탐색기에서 요렇게 Repo-Browser를 실행한다.
svn 접속주소를 설정한다.

docker에서 띄웠으니 localhost 로 작성하고, docker는 18081로 포트포워딩 된 상태이다. 위에서 SVN은 18081로 커스텀포트를 지정했으니 이렇게 설정하고 접속하면 된다.

만약, svn 포트를 지정하지 않았다면 (버전에 따라 다르지만) 3690 포트를 사용하게 된다. 그렇다면 docker도 포트포워딩을 3690으로 해줬어야 같은 환경에서 접속이 가능할 것이다.


접속에 성공한 모습

정상적으로 접속에 성공하면 별다른 메세지 없이 바로 실행된다. 겸사겸사 위에서 띄워둔 로그를 보면 뭔가 길게 잔뜩 있다.

163 2024-08-14T00:50:20.194435Z 172.17.0.1 - svn open 2 cap=(edit-pipeline svndiff1 accepts-svndiff2 absent-entries depth mergeinfo log-revprops) / SVN/1.14.3%20(x64-microsoft-windows) TortoiseSVN-1.14.7.29687
163 2024-08-14T00:50:20.195027Z 172.17.0.1 - svn get-latest-rev
163 2024-08-14T00:50:20.195658Z 172.17.0.1 - svn stat /@0
163 2024-08-14T00:50:20.196204Z 172.17.0.1 - svn get-latest-rev
163 2024-08-14T00:50:20.196747Z 172.17.0.1 - svn get-lock /
164 2024-08-14T00:50:20.201736Z 172.17.0.1 - svn open 2 cap=(edit-pipeline svndiff1 accepts-svndiff2 absent-entries depth mergeinfo log-revprops) / SVN/1.14.3%20(x64-microsoft-windows) TortoiseSVN-1.14.7.29687

(생략)


이제 커밋을 해보자. 잘 올라가는지.


5. SVN 커밋

제대로 하려면 IDE 세팅하고 직접 소스코드 커밋도 해보고 그랬을텐데, 내가 하려는 것은 SVN 디렉토리 백업이 정상적으로 동작하는지를 보려는 것이기 때문에 이 과정은 생략했다. 그냥 파일 커밋을 하고 이게 디렉토리로 복붙해도 잘 되는지만 보면 되니까.

SVN Repo-Browser에서 마우스 오른클릭 후 Add File를 선택한다. 그 후에 아무거나 파일을 선택해서 커밋하면 된다.

메뉴 띄우고
대충 파일 아무거나 넣고, 커밋메시지 공들여 작성해준다. 이것도 백업되는지 확인해봐야 하니까.

깜빡하고 계정정보 입력하는 부분을 캡쳐하지 못했는데, 위의 3-2. SVN 계정 생성 에서 생성한 계정 정보를 입력하면 된다. 그럼 커밋 완료. 서버로그도 같이 확인한다.


SVN Repo-Browser 에 Commit 된 모습

163 2024-08-14T00:50:20.194435Z 172.17.0.1 - svn open 2 cap=(edit-pipeline svndiff1 accepts-svndiff2 absent-entries depth mergeinfo log-revprops) / SVN/1.14.3%20(x64-microsoft-windows) TortoiseSVN-1.14.7.29687
163 2024-08-14T00:50:20.195027Z 172.17.0.1 - svn get-latest-rev
163 2024-08-14T00:50:20.195658Z 172.17.0.1 - svn stat /@0
163 2024-08-14T00:50:20.196204Z 172.17.0.1 - svn get-latest-rev
163 2024-08-14T00:50:20.196747Z 172.17.0.1 - svn get-lock /
164 2024-08-14T00:50:20.201736Z 172.17.0.1 - svn open 2 cap=(edit-pipeline svndiff1 accepts-svndiff2 absent-entries depth mergeinfo log-revprops) / SVN/1.14.3%20(x64-microsoft-windows) TortoiseSVN-1.14.7.29687
164 2024-08-14T00:50:20.202276Z 172.17.0.1 - svn get-latest-rev
164 2024-08-14T00:50:20.202793Z 172.17.0.1 - svn stat /@0
165 2024-08-14T00:50:20.207001Z 172.17.0.1 - svn open 2 cap=(edit-pipeline svndiff1 accepts-svndiff2 absent-entries depth mergeinfo log-revprops) / SVN/1.14.3%20(x64-microsoft-windows) TortoiseSVN-1.14.7.29687
(생략)


대충 업로드가 다 되었다. 이로써 기본적인 SVN 설치, 설정, 연동까지 수행했다.

반응형
블로그 이미지

김생선

세상의 모든것을 어장관리

,
반응형

개발을 하다가 누군가가 세팅해준 서버에 접속하여 몇가지 명령어를 쓰다보면 그냥 뭐 잘 된다. 

그러다가 우리가 리눅스 서버를 설정 후 쓰려면 여간 불편한게 한두개가 아니다. 가령 vi 명령어나 뭐 그런 여러가지 잡다구리 한 것들. 그래서 내가 쓰는 몇가지들을 정리하고, 이후에 까먹으면 이걸 보기로 했다.


로컬 개발서버이기 때문에 yum 설치로 수행하였다.


1. yum 패키지 업데이트 
yum update -y


2. 기본 유틸 패키지
yum install -y shadow-utils : 사용자 계정 설정 패키지
yum install -y util-linux-user : 시스템 관리 설정 패키지
yum install -y passwd : 비밀번호 설정 패키지


3. ps 명령어 패키지
yum install -y procps-ng


4. vim 에디터
yum install -y vim


5. wget
yum install -y wget


6. JDK 1.8
yum install -y java-1.8.0-openjdk-devel


7. ls 컬러링
vi ~/.bashrc
alias ls='ls --color=auto' 추가
source ~/.bashrc


8. history 명령어 갯수 설정

vi ~/.bashrc

export HISTSIZE=[숫자]

source ~/.bashrc


반응형
블로그 이미지

김생선

세상의 모든것을 어장관리

,